Testing a book's code, part 3: Testing a game
MP 79: Testing code that might not seem testable at first.
Note: This is the third post in a seven-part series about testing.
In the last post we focused on testing the basic programs in the first half of Python Crash Course. So far the test suite covers 60 programs, which only print output to the terminal. The tests run on macOS and Windows, and should run on most Linux systems as well. This first phase of work brought up some interesting testing concepts such as parametrization and fixtures, but the code that was being tested was pretty simple.
In this post we’ll make sure the test suite can be run with multiple versions of Python. After that, we’ll test the first project in the book, Alien Invasion. This is a 2d game project, and it’s probably not obvious at all how to test it. We’ll discuss those challenges, make a plan to address them, and write a test that gives us confidence that the game project works as it’s supposed to.
Running tests on different versions of Python
Note: I drafted this post last fall, before Python 3.12 was released. I’m leaving the version references as they were before 3.12 came out, because it shows how the test suite can be used during the pre-release period for new versions of Python.
Most of my Python work at the moment uses Python 3.11.5, the most recent point release of the latest version of Python. The test suite runs in a virtual environment that was built with this version.
However, Python 3.12 is coming out soon, and the third release candidate (3.12.0rc3) was released about a week ago. I’d like to test the book’s code against this version, and each release candidate that comes out until 3.12.0 is officially released. This helps find any bugs in the pre-release versions of Python, and lets me address any incompatibilities in the existing codebase with newer versions of Python.
I use pyenv to manage Python versions on my system. 3.12.0rc3 isn’t available quite yet through the Homebrew version of pyenv, so I’m going to use 3.12.0rc2 for this round of testing.
To make testing with different versions easier, I’m going to build a new virtual environment called .venv_3120rc2, and run the tests with that environment active. Here’s the terminal commands I’m using to switch between different Python versions, and verify that the commands are having the expected effect:
(.venv)$ python --version
Python 3.11.5
(.venv)$ deactivate
$ pyenv local 3.12.0rc2
$ python --version
Python 3.12.0rc2
Now we can make a new virtual environment, and run the tests using that version of Python:
$ python -m venv .venv_3120rc2
$ source .venv_3120rc2/bin/activate
(.venv_3120rc2)$ pip install pytest
(.venv_3120rc2)$ pytest -q
... [100%]
60 passed in 0.94s
This shows that all the basic programs in the book should continue to run without issue under Python 3.12.
Note that this did not involve any changes to the test suite itself. The test suite uses the Python interpreter from the active virtual environment, so all we did was set up a second virtual environment. We can keep using the 3.12.0rc2 environment, or we can switch back to the 3.11.5 environment whenever we want.
Making it clear which version was used for testing
Dealing with multiple Python versions is not always straightforward. When you have multiple versions installed, it’s easy to end up accidentally using a different version than what you intended. This is especially true if everything works, and there’s no version-specific output.
Let’s add a short block that shows exactly which version was used to run the tests. We’ll do this in tests/conftest.py:
...
@pytest.fixture(scope="session")
def python_cmd():
    """Return the path to the venv Python interpreter."""
    return utils.get_python_cmd()

def pytest_sessionfinish(session, exitstatus):
    """Custom cleanup work."""

    # Show which version of Python was used for tests.
    python_cmd = utils.get_python_cmd()
    cmd = f"{python_cmd} --version"
    output = utils.run_command(cmd)

    print(f"***** Tests were run with: {output}")
If you include a function called pytest_sessionfinish() in conftest.py, that function will be called automatically when the test session is over. We’d like to use the python_cmd fixture in this function, but fixtures are only available during a test session. By the time pytest_sessionfinish() is called, the test session is over. So, we need to pull the code for getting the value of python_cmd out into a utility function. This shortens the original python_cmd() fixture function, which effectively becomes a wrapper for the new utility function.
In pytest_sessionfinish(), we call python —-version, where python is actually the full path to the interpeter that’s being used throughout the test session. We then print a line showing what the output of this call is. Normally you need to include the -s flag when calling pytest to see the output of print() calls. That won’t be necessary here, because the output of any print() calls in pytest_sessionfinish() are included in the overall test output by default.
When we run tests using .venv, we should see output reflecting Python 3.11. When we run tests using .venv_3120rc2, we should see output referencing Python 3.12:
$ source .venv/bin/activate
(.venv)$ pytest -q
... [100%]
***** Tests were run with: Python 3.11.5
60 passed in 0.90s
(.venv)$ deactivate
$ source .venv_3120rc2/bin/activate
(.venv_3120rc2)$ pytest -q
... [100%]
***** Tests were run with: Python 3.12.0rc2
60 passed in 0.96s
The output here shows one test run using Python 3.11.5, and a second run using Python 3.12.0rc2.
This actually caught an inconsistency for me while doing this writeup. I sometimes install pytest to my global Python environment, so I can run quick tests anywhere. But if you then install pytest to a virtual environment, it can be unclear at times which instance of pytest is being used. I ran pytest in an active 3.12.0rc2 virtual environment, but the output indicated Python 3.11 was being used. Even with the virtual environment active, pytest was still pointing to my system-level instance of pytest, because it was the first one listed in my path variable. I ended up uninstalling that system-level pytest, to avoid any future inconsistencies like this.
Running pytest without the -q flag usually shows which interpreter was used to start the test suite, but I always want to know that python_cmd is picking up the version I think it is.
Why not use tox?
The tox library automates testing across different versions of Python, and different versions of third-party libraries as well. You might be wondering why I don’t use tox to manage versions instead of making individual virtual environments, which is similar to what tox does for you behind the scenes.
I haven’t used tox before, but I’m looking forward to using it when I have a need for it. I’m not using it for this test suite because I usually want to run tests against a specific version of Python, or a specific version of a library. I rarely want to run a full matrix of all versions of Python with all versions of each library. For my testing purposes, most of the time I want to pick a specific version of Python and maybe a specific version of a library. This is another way that testing for a book differs from testing traditional software projects.
Testing Alien Invasion
Testing video games is notoriously difficult. Most discussions of testing software focus on exercising code which has identifiable inputs we can test, and outputs we can make assertions against. The output of video games depends on a variety of inputs that often can’t be replicated fully. That’s why game companies pay people to play through their games in specific ways, and report on their experiences. It’s not nearly as fun as it sounds to young players.
Fortunately my testing needs are simple: I want to make sure the game runs on recent versions of Python and Pygame. The original game in the first edition of the book was function-based, and it would have been rather hard to write an automated test for the game. I restructured the game for the second edition of the book so that the entire game is represented by a class. This made the code a little more complicated at the start of the project, but resulted in a much cleaner overall structure for the finished game. It also made the game much more testable—you can import the main game file, create an instance of the game, and script the same kinds of actions an actual player might take.
A few years ago I wrote up a guide for writing a script that would play the game automatically. It’s kind of fun to write a program that plays a game for you. Alien Invasion is a classic space shooter, so you can implement algorithms like “move the ship back and forth, firing continuously until the screen is cleared”. You can also write algorithms that target specific aliens, or algorithms that combine multiple strategies and include random fluctuations in behavior.
This background work made it fairly straightforward to figure out how to test Alien Invasion. The test function will call a script that automates the game play. The automation script will implement a simple strategy that clears one screen of aliens, and then exits. We’ll then make a few assertions about certain conditions that should be true at the end of Level 1. If those simple assertions pass, I’ll be confident that the game project works on the versions of Python and Pygame that were used for testing. I have no need to test more complex aspects of the game itself.
Automating gameplay
Here are the most important parts of ai_tester.py, the script that automates game play for testing purposes:1
class AITester:

    def __init__(self, ai_game):
        """Automatic player for Alien Invasion."""
        # Make a reference to the game object.
        self.ai_game = ai_game

    def run_game(self):
        """Replaces the original run_game(),
        so we can control the game.
        """
        # Start out in an active state.
        self.ai_game.game_active = True

        # Speed up the game for testing.
        self.ai_game.settings.speedup_scale = 50
        self.ai_game.settings.increase_speed()

        # Start the main loop for the game.
        while True:
            # Still call ai_game._check_events(),
            # so we can use keyboard to quit.
            self.ai_game._check_events()

            # Sweep the ship right and left continuously.
            ship = self.ai_game.ship
            screen_rect = self.ai_game.screen.get_rect()

            if not ship.moving_right and not ship.moving_left:
                # Ship hasn't started moving yet; move to the right.
                ship.moving_right = True
                ...

            # Fire as often as possible.
            self.ai_game._fire_bullet()

            self.ai_game._update_screen()
            self.ai_game.clock.tick(60)

            if self.ai_game.stats.level > 1:
                break
Notice that AITester does not inherit from AlienInvasion. Instead, it takes a reference to the game object and then defines its own run_game() method. That method takes the place of the original run_game() method, so we can control all actions in the game.
In this automated player, we start the game in an active state instead of waiting for the player to press a start button. We speed the game up by a factor of 50 for testing. If you speed it up too much, the aliens come down too fast to run through any actual game interactions.
We then start the ship moving and sweep it left and right continuously. As long as the game is active, we keep firing bullets at the aliens. We break out of the game’s main loop as soon as we’ve finished the first level.
Testing the game
Now we need to write a test function that calls AITester. We’ll do that in a new test file, called test_alien_invasion.py:
from pathlib import Path
...

def test_ai_game():
    """Test basic functionality of the game."""

    # Add source path to sys.path, so we can import AlienInvasion.
    ai_path = Path(__file__).parents[1] / "chapter_14" / "scoring"
    sys.path.insert(0, str(ai_path))
    from alien_invasion import AlienInvasion
    from ai_tester import AITester

    # Create a game instance, and an AITester instance, and run game.
    os.chdir(ai_path)
    ai_game = AlienInvasion()
    ai_tester = AITester(ai_game)
    ai_tester.run_game()

    # Make assertions to ensure first level was played through.
    assert ai_game.stats.score == 3375
    assert ai_game.stats.level == 2
This is a fairly short test function; most of the work for testing the game is already in the AITester class. Here we modify sys.path to include the directory where alien_invasion.py is located. There are many versions of the game project in the repository, to help readers who get off track in the game’s development. These are versions of the project as it stands at the end of each major section in the book. We only need to test the final version of the game; if that works, then all the other versions should work as well.2
The main game file imports a number of other modules, which all depend on relative imports. So, we use os.chdir() to switch to the directory where alien_invasion.py is located. Since the game project doesn’t modify any files, we can safely run it from that directory.
Once in the ai_path directory, we can make an instance of AlienInvasion, and then make an instance of AITester. We call run_game(), and it automatically plays the game through one level.
When the first level is complete, we make two simple assertions: that the score is correct for having destroyed one screen’s worth of aliens, and that we’re at level 2. There are many more assertions we could consider, but that’s not really the point. The main point of this test is to show that the current code works for running the game, on the current version of Python and Pygame.
This test passes, and you can watch the AI player as it plays through the first level:
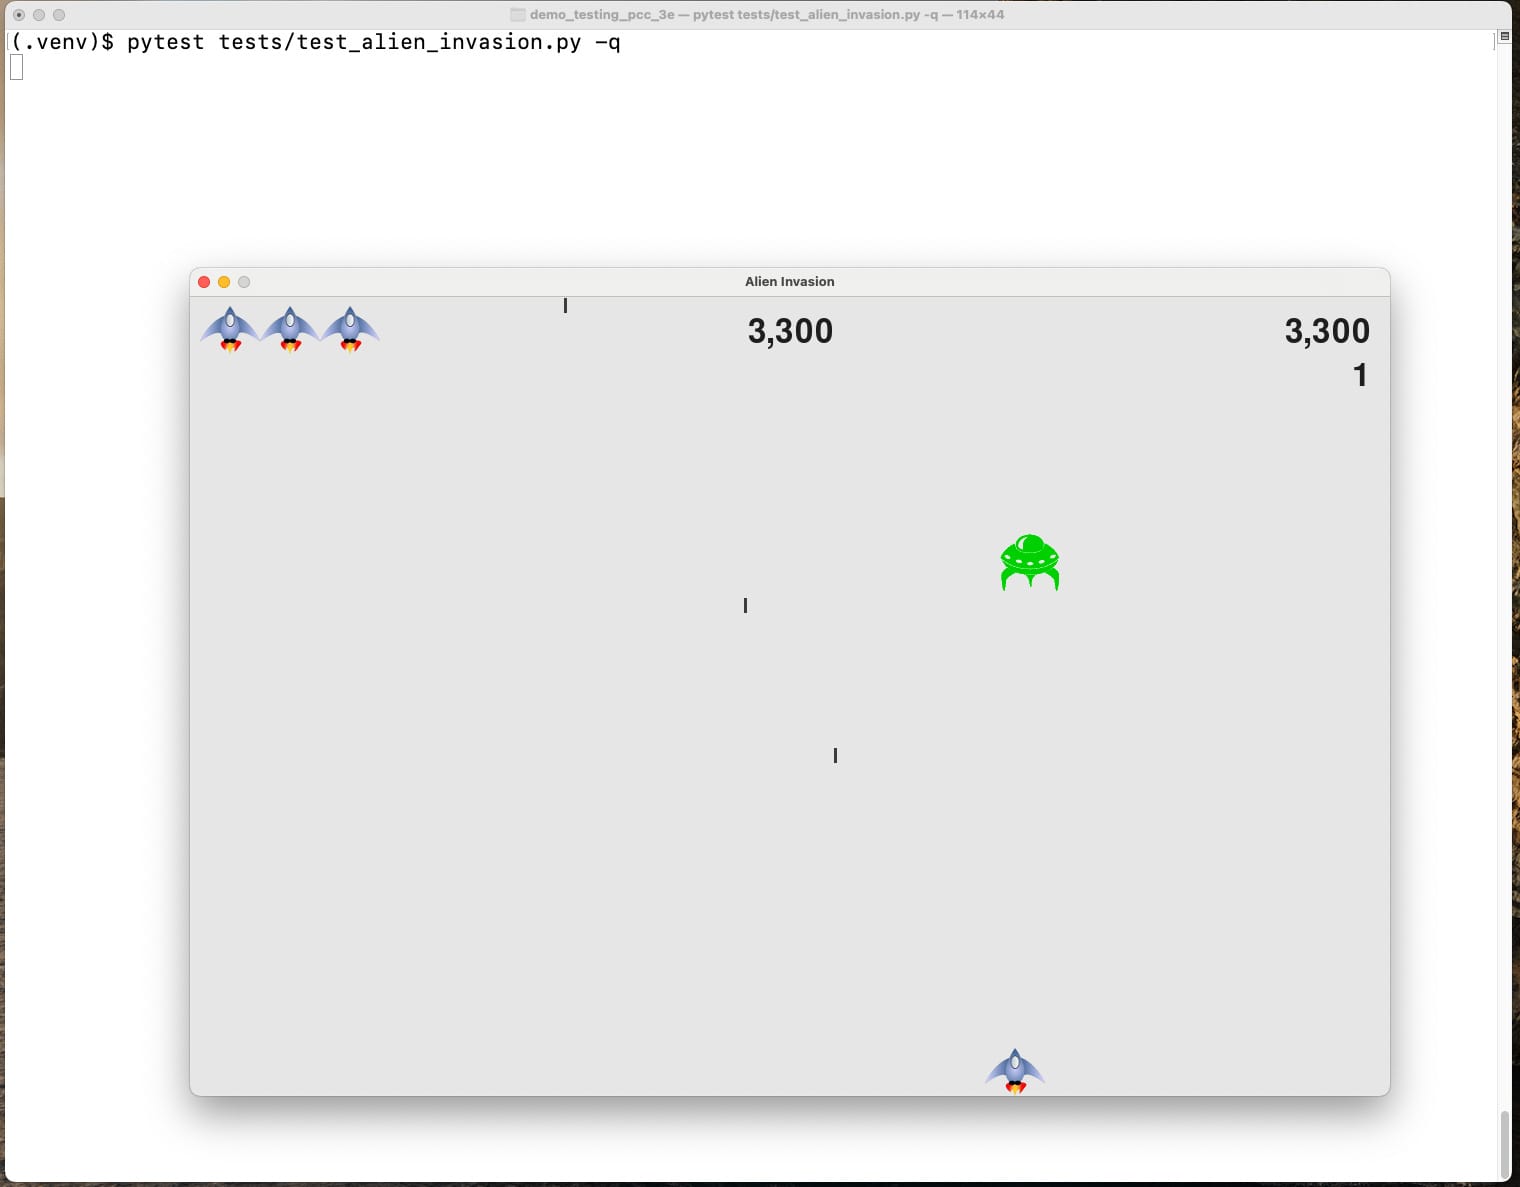
Interestingly, I slowed the game down in order to make a screenshot, and noticed the simple game play algorithm doesn’t actually clear the screen if it’s not sped up.
At full speed, the test finishes in about 6 seconds:
(.venv)$ pytest tests/test_alien_invasion.py -q
. [100%]***** Tests were run with: Python 3.11.5
1 passed in 6.39s
Six seconds is slow for a single test in most projects, but this is quite reasonable for what it does. It’s reassuring to see the game running for a few seconds, and I’m never going to use this in a CI environment. It’s also easy to exclude this test if I’m focusing on other tests.
Testing different Pygame versions
One of the main goals of this test suite is to be able to test different versions of a specific library. To support this, I’m going to add a CLI argument to the test suite, so I can run the following command:
$ pytest tests/test_alien_invasion.py --pygame-version x.y.zHere’s the new function in conftest.py that adds this CLI argument:
def pytest_addoption(parser):
    parser.addoption(
        "--pygame-version", action="store",
        default=None,
        help="Pygame version to test"
    )
The pytest_addoption() function adds new CLI options to pytest calls. The call to parser.addoption() defines —-pygame-version as an individual argument. Any value passed with this argument will be stored, and accessible throughout the test suite.
We’ll use this argument in a fixture function in test_alien_invasion.py:
@pytest.fixture(scope="module", autouse=True)
def check_pygame_version(request, python_cmd):
    """Check if the correct version of Pygame is installed."""
    pygame_version = request.config.getoption("--pygame-version")

    if pygame_version:
        print(f"\n*** Installing pygame {pygame_version}\n")

        cmd = f"{python_cmd} -m pip install pygame=={pygame_version}"
        output = utils.run_command(cmd)
The code to check the version of Pygame needed for testing is placed in a fixture, for a couple reasons. First, this is setup work; it’s not really what we’re testing. That kind of work tends to belong in fixtures as opposed to test functions. But also, we’re going to do this same kind of thing when testing the other projects in the book. We’ll be using code similar to this later, and it will be easier to reuse this code if it’s implemented as a fixture from the start.
This fixture doesn’t need to return anything. When a fixture doesn’t have a return value, you can specify autouse=True, and the fixture will be called automatically for all tests in its scope. This fixture only applies to Pygame, so I’ve placed it in the test_alien_invasion.py file and given it the module scope.
You can check a custom pytest CLI argument by calling request.config.getoption(). If —-pygame-version was specified, we print a message that we’re installing a specific version, and then install that version to the active virtual environment.
Note that there’s no change needed to the actual test function, test_ai_game(). With an autouse fixture, the setup work is done automatically by the fixture.
We need to pass the -s flag in order to see the output of print() calls in fixtures and test functions. We can now test any version of Pygame we want. I’m usually interested in testing development releases, so I’ll specify a recent development release:
(.venv)$ pytest tests/test_alien_invasion.py --pygame-version 2.5.0.dev2 -qs
*** Installing pygame 2.5.0.dev2
pygame 2.5.0.dev2 (SDL 2.26.4, Python 3.11.5)
Hello from the pygame community...
.
***** Tests were run with: Python 3.11.5
1 passed in 19.24s
As the test suite runs, we can see that the requested version of Pygame is being installed. That information is verified in the output that Pygame generates when it’s loaded. We’ve modified the virtual environment in a way that will persist after the test runs, but we’ll address that in a moment. Note that this session takes longer than usual, because we’re installing a package and using it for the first time during the test run.
The check_library_version() utility function
We’re going to use this same approach for the data visualization and web app projects as well, so let’s move the code for checking library versions to a utility function. When doing small refactoring work like this, I like to write the function call I want to make, and then write the function itself.
Here’s the new version of the fixture in test_alien_invasion.py:
@pytest.fixture(scope="module", autouse=True)
def check_pygame_version(request, python_cmd):
    """Check if the correct version of Pygame is installed."""
    utils.check_library_version(request, python_cmd, "pygame")
All the code that was in this function is relevant to the task of checking the version of any library, so it all gets moved to the utility function. This one-line fixture function does still need to be in the test_alien_invasion.py module, however, because this is where we know which library to check for. Also, general utility functions can’t use fixtures as parameters. So, we have to keep the request and python_cmd fixtures here, and pass those values to the utility function.
Here’s the generalized utility function for checking and installing specific versions of a library:
def check_library_version(request, python_cmd, lib_name):
    """Install a specific version of a library if needed."""
    lib_version = request.config.getoption(f"--{lib_name}-version")

    if lib_version:
        print(f"\n*** Installing {lib_name} {lib_version}\n")
        cmd = f"{python_cmd} -m pip install {lib_name}=={lib_version}"
        output = run_command(cmd)
        print(output)

    # Regardless of what version was requested,
    # show which version is being used.
    cmd = f"{python_cmd} -m pip freeze | grep {lib_name}"
    result = subprocess.run(cmd, capture_output=True,
            text=True, check=True, shell=True)
    output = result.stdout.strip()

    print(f"\n*** Running tests with {output}\n")
This works for installing specific versions of Pygame, and it should work for the other libraries we’ll need to check as well. I’m printing the output of the pip install command, because it’s helpful to see that output while the test is running.
Issues with managing environments can be subtle, so regardless of which version was requested we display the actual version that’s being used for testing. We do this with the following command:
$ python -m pip freeze | grep pygameThe | character is a pipe; we’re piping the output of pip freeze to grep, which shows any lines that include “pygame”. When you include a pipe in a command that’s executed through subprocess.run(), you have to include the argument shell=True. Otherwise the output of the first command goes to a different shell environment. Also, the command needs to be submitted as a single string, rather than a list of parts. This means we can’t use the utils.run_command() function. There’s no need to adapt utils.run_command() to this usage, we’ll just call subprocess.run() directly here.
Now the output is clear about what version of the library is being used for testing:
(.venv)$ pytest tests/test_alien_invasion.py --pygame-version 2.4.0 -qs
*** Installing pygame 2.4.0
Collecting pygame==2.4.0
    ...
*** Running tests with pygame==2.4.0
pygame 2.4.0 (SDL 2.26.4, Python 3.11.5)
    ...
.
***** Tests were run with: Python 3.11.5
1 passed in 10.54s
We get a message about what’s being installed, and confirmation about exactly which version is being used. There’s a bit of redundant output here because things are going well, but it’s really helpful to have all this information available when things don’t go as expected.
Windows compatibility
I do most of my work on macOS, and forget sometimes that I’m using tools that aren’t available on Windows. The previous version doesn’t work on Windows because of the pipe to grep.
We can fix that by getting all of the output from pip freeze, and then filtering for the output specific to the library we’re focusing on:
def check_library_version(request, python_cmd, lib_name):
    """Install a specific version of a library if needed."""
    ...

    # Regardless of what version was requested,
    # show which version is being used.
    cmd = f"{python_cmd} -m pip freeze"
    output = run_command(cmd)
    lib_output = [
        line for line in output.splitlines()
        if lib_name in line
    ]

    print(f"\n*** Running tests with {lib_output}\n")
This works on both macOS and Windows, and I see no reason it won’t work on Linux as well.
Specifying requirements
At this point, we haven’t specified requirements for the test suite. The book’s repository doesn’t have a set of requirements, because the code isn’t usually run directly from the repository. It’s usually just used as a reference for the book.
Here are the requirements for the tests that have been written so far:
(.venv)$ pip freeze > requirements.txt
(.venv)$ cat requirements.txt
iniconfig==2.0.0
packaging==23.2
pluggy==1.3.0
pygame==2.5.2
pytest==7.4.4
There are just a small set of requirements, but pinning them makes it easier to run the tests on different systems. It will also make it possible to reset the test environment to its original state, after installing specific versions of libraries during individual test runs.
Resetting the test environment
There’s one problem with the way we’ve implemented support for —-pygame-version. There’s a mismatch between the requirements.txt file that pins the versions for default test runs, and what’s actually installed after specifying a different version of Pygame. For example, here’s what I see after doing a test run with Pygame 2.4.0:
(.venv)$ cat requirements.txt| grep pygame
pygame==2.5.2
(.venv)$ pip freeze | grep pygame
pygame==2.4.0
The requirements specify Pygame 2.5.2, but what’s actually installed is whatever version the last test run used.
A simple way to address this is to reinstall from requirements.txt at the end of every test run. This is a really quick and straightforward way to make sure the environment returns to a consistent state after each test session.
We can do this cleanup work in the pytest_sessionfinish() function, in conftest.py:
def pytest_sessionfinish(session, exitstatus):
    """Custom cleanup work."""
    python_cmd = utils.get_python_cmd()

    # Reset any libraries that had a different version installed
    #   during the test run.
    print("\n\n--- Resetting test venv ---\n")

    req_txt_path = Path(__file__).parents[1] / "requirements.txt"
    req_txt_path = req_txt_path.as_posix()

    cmd = f"{python_cmd} -m pip install -r {req_txt_path}"
    output = utils.run_command(cmd)

    changed_lines = [
        line for line in output.split("\n")
        if "Requirement already satisfied" not in line
    ]

    if changed_lines:
        for line in changed_lines:
            print(line)
    else:
        print("  No packages were modified.")

    print("\n--- Finished resetting test venv ---\n")

    # Show which version of Python was used for tests.
    ...
We get the value for python_cmd at the start of the function, because it’s used to reset the virtual environment and to show which version of Python was used. We get the path to requirements.txt, and then call pip install. We filter for any lines related to a package that needed to be reset, and print that output. If every requirement was already satisfied, we print an indication that nothing was modified during the test run:
$ pytest tests/test_alien_invasion.py -q -s --pygame-version 2.4.0
*** Installing pygame 2.4.0
Collecting pygame==2.4.0
    ...
*** Running tests with ['pygame==2.4.0']
.
--- Resetting test venv ---
Collecting pygame==2.5.2
    ...
Successfully installed pygame-2.5.2
--- Finished resetting test venv ---
***** Tests were run with: Python 3.11.5
1 passed in 16.60s
This test still takes about 6 seconds if you’re using a version of Pygame that’s already been used recently. If a new version was installed, the test takes about 16 seconds. That’s not surprising, and is still so much faster than testing different versions manually.
I’ll note that this does not currently work for me on Windows. I think pip isn’t cleaning up its temp directories when it installs a specific version of Pygame, and those directories are interfering with the final call to pip install. I’m going to see if this is an issue with all libraries, or just Pygame, and sort it out a little later.
The default output that pytest shows is really useful for most testing scenarios. This extra output is quite helpful when testing against particular versions. If I request a specific version for testing and see the message No packages were modified, I know something went wrong with the test run. This is much better than a test run that just silently passes when it shouldn’t.
Running this test last
There’s one last modification I’d like to make to this test. The Pygame window disappears by the time the test suite finishes, but I can’t find a way to make it disappear as soon as the test for Alien Invasion finishes. A workaround is to make sure this test runs last.
The pytest-ordering plugin lets you control some aspects of the order in which tests are run. My needs are simple; I want this one test module to run last. After installing pytest-ordering, this one line at the top of test_alien_invasion.py causes the module to be run last:
pytestmark = pytest.mark.run(order=-1)

@pytest.fixture(scope="module", autouse=True)
def check_pygame_version(request, python_cmd):
    ...
Now when you run the entire test suite the Alien Invasion test runs last, and the Pygame window doesn’t hang around covering the terminal output.
Conclusions
Some projects can seem untestable, especially graphic-oriented projects. But if you can run your code, you can almost certainly test your code. Articulating the exact kind of tests you want to run, and what you want to get out of your test suite, can help determine how to approach building your test suite.
Standard tools like tox can be used to run test suites efficiently, in the ways most people need to test their software projects. If your needs don’t match the typical use cases of those tools, you can still manage your test environment to achieve the testing goals you originally set. This is part of why it’s good to articulate your goals before you start writing test code. Otherwise you can fall into the trap of writing whatever kinds of tests are most natural to write with the tools you have at hand, rather than the ones you actually need.
In testing, more information is often better than less information. It’s certainly worthwhile to have the ability to run tests with terse output, but you also probably want the option to get detailed information about a test run. Don’t be afraid to insert diagnostics into your test suite, that you can turn to when things aren’t behaving as you expect them to.
In the next post we’ll start to test the data visualization projects. This will bring up a number of issues related to making assertions about output in the form of images and HTML files.
Resources
You can find the code files from this post in the mp_testing_pcc_3e GitHub repository.
Note that the name of this file does not start with test_. We don’t want pytest to discover this file and try to run it. We want to call this file ourselves from a file that’s picked up by pytest. ↩
If any other versions don’t work for some reason, that would be an issue with my code, not a compatibility issue with Python or Pygame. Those kinds of errors would be straightforward to fix, as long as I know the final version of the game works. ↩