Improving code blocks in Substack newsletters
MP #19: Using Python to prototype a different approach.
Note: I posted a supplementary essay on Friday, titled Yes you should still learn to code*. I don’t plan to send posts as emails on days other than Tuesdays and Thursdays.
Writing about code online has become much more enjoyable in recent years, due in no small part to the variety of styling options available for code blocks. If you can present code well, it’s easier to write about code well. Code formatting in email newsletters, however, feels like it’s stuck in the mid 2000s. I don’t think it has to stay that way.
When you add a code block to a web page, modern tools let you add a neatly-formatted filename, highlight specific lines, and include syntax highlighting and line numbers. Most newsletter platforms that I’m aware of, including Substack, support none of these options. Some platforms allow you to write custom HTML, but that’s not a very satisfying solution. Most of us don’t have access to good tools for testing how well HTML renders across the wide variety of email clients in use today, and writing your own HTML is not a very efficient process.
There are valid reasons why a platform like Substack can’t offer all the same formatting options that web-focused tools offer. However, two simple features could be relatively simple to implement, and go a long way toward helping people write more clearly about code in newsletters: neatly formatted title bars for code blocks, and the option to highlight specific lines.
Two features could go a long way toward helping people write more clearly about code in newsletters: neatly formatted title bars for code blocks, and the option to highlight specific lines.
In this post we’ll write a demo parser that shows how Substack could make a few small changes to their full parser, and offer these two options to writers. I believe they could do this without making any changes to their current editor’s interface.
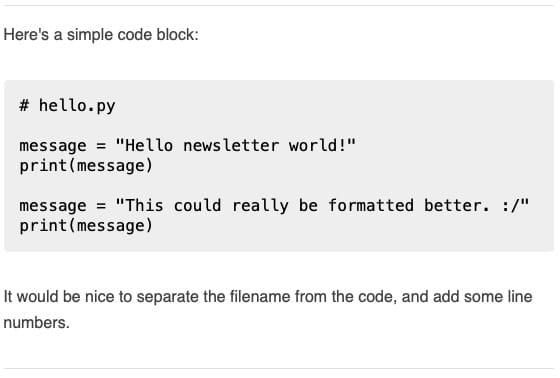
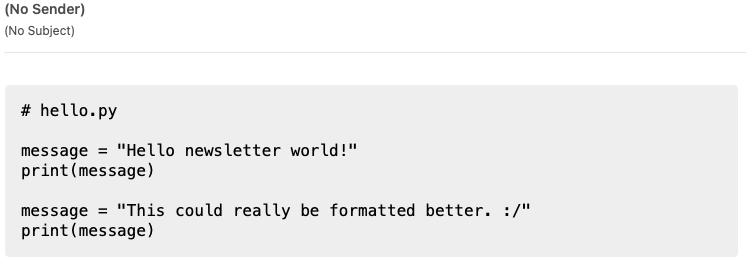
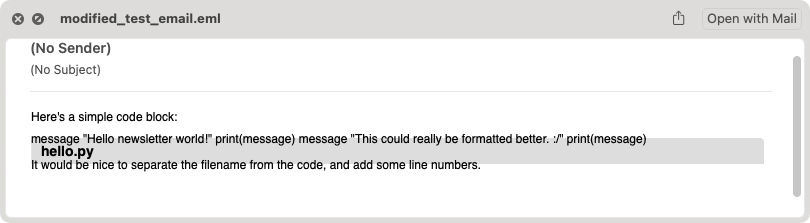
To clarify the issue, here’s my current best approach at showing a filename for a code block:
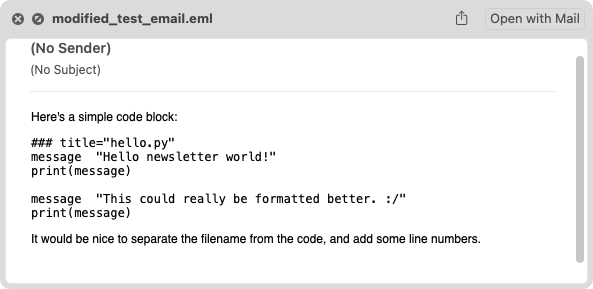
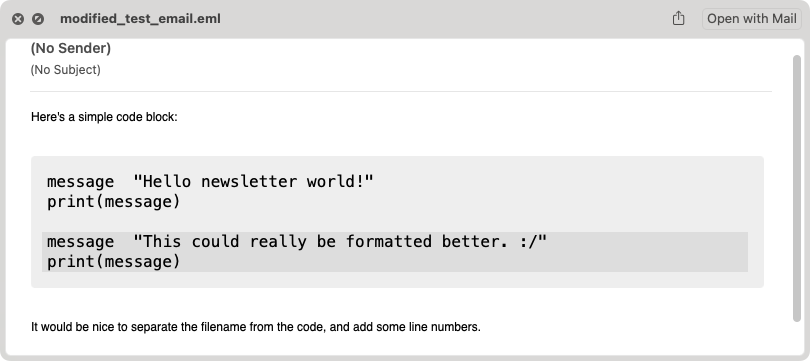
And here’s what it could look like with a simple change to how posts are processed for email distribution:

If you’re here for the Python and don’t care much about email authoring tools, you still might find this post interesting. We’ll write the parser by looping over the lines in a draft post, but we won’t be able to use a simple for loop. Sometimes we’ll need to work with more than one line at a time, to move style rules between different parts of the code block. Instead of a for loop we’ll use an iterator, so we can call next() whenever we need another line from the post.
Why presentation matters
It’s almost always helpful to let readers know what filename a code listing corresponds to, especially if the post discusses more than one file. Currently there’s no good way to label a code block. Including the filename as a comment at the start of a listing mixes the filename in with the code. It also adds visual clutter to the code block.
You could mention filenames in the text, but that approach gets tedious for readers. It separates the filename from the actual listing, which means readers have to jump back and forth between the code and the text more often.
Some authors resort to just using screenshots of code. That looks nice, but it’s functionally much worse. Many people want to copy and paste code from articles so they can run it themselves.
The only styles you can apply in a code block are bold, italics, and strikethrough. None of these options effectively address the need to include filenames, and they don’t help much when you want to discuss more than one specific line from a listing either.
The rest of this post shows how to develop a parser that generates an improved version of the default Substack code block, without requiring any changes to the post editor’s interface.
How emails are generated
When a writer clicks Publish in the Substack editor, the post is processed and distributed in a number of different ways. Here’s a diagram showing roughly what happens to the raw post in order to turn it into an email that’s ready for delivery:
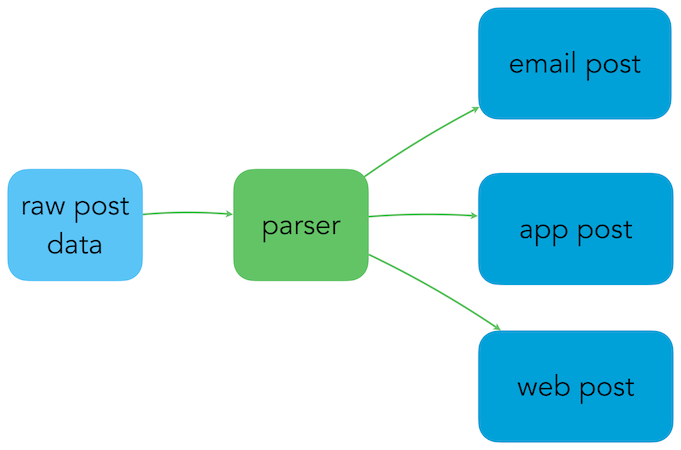
When a writer clicks Publish in the post editor, it sends the raw post data to Substack’s servers. A parser, or series of parsers, converts the post data into a variety of formats that are appropriate for delivery over email, through Substack’s apps, and on their website.
To show that better code blocks are possible, we’ll write a parser that converts the raw post data into an email with a restyled code block. We’ll do this using only the resources that Substack is already using in the emails they deliver.
What Substack generates
If we want to write our own parser, we’ll need a way to view the emails that we generate. Most email clients let you save an email as a file. For example in Gmail’s web viewer, you can click the three dots in the upper right and select Download email. If you open the resulting .eml file in a text editor, you’ll find the following structure:
Delivery information
Plaintext version of the email
HTML version of the email
CSS styles
Default Substack email elements
Post body
Default Substack footer elements
In macOS you can right click a .eml file, and select Quick Look to see a rendered version of the email message. Here’s what the preview version of the test message looks like:1

The preview doesn’t load all of Substack’s media assets, but it does render the body of the email using the CSS rules that are embedded in the email.
There’s a bunch of information in the .eml file that we don’t need to deal with for the purposes of exploring code blocks, and there’s also some private delivery information that I don’t want to share. But we can strip out everything except a few header lines, the CSS rules, the code block, and some closing tags. Here’s what test_email.eml looks like after stripping out this extra information:
We can take this one step further and make a template file, which will be useful when making our own parser. The template file has all the CSS that Substack emails include, but only one line where the post would be. Here’s what my_template.eml looks like:
Content-Type: text/html; charset="ascii"
Content-Transfer-Encoding: quoted-printable

<html style=3D""><head><title>Post title</title><style>
@media all and (-ms-high-contrast: none), (...) {
...

@media not all and (min-resolution: 0.001dpcm) {
}
</style></head><body class=3D"..." style=3D"...">

post_body

</body></html>
The full file includes almost 900 lines of CSS rules. When we write our parser, we’ll replace the line post_body with our modified code block, and anything else that's included in the post.2
Styling the code block
We need to look at how Substack currently styles its code blocks, and figure out some CSS rules that render titles appropriately. It’s easier to do this with HTML than a .eml file, but fortunately it’s straightforward to convert the file test_email.eml to HTML.3
After making this conversion, we can open test_email.html in a browser and use the inspector to examine Substack’s CSS rules:
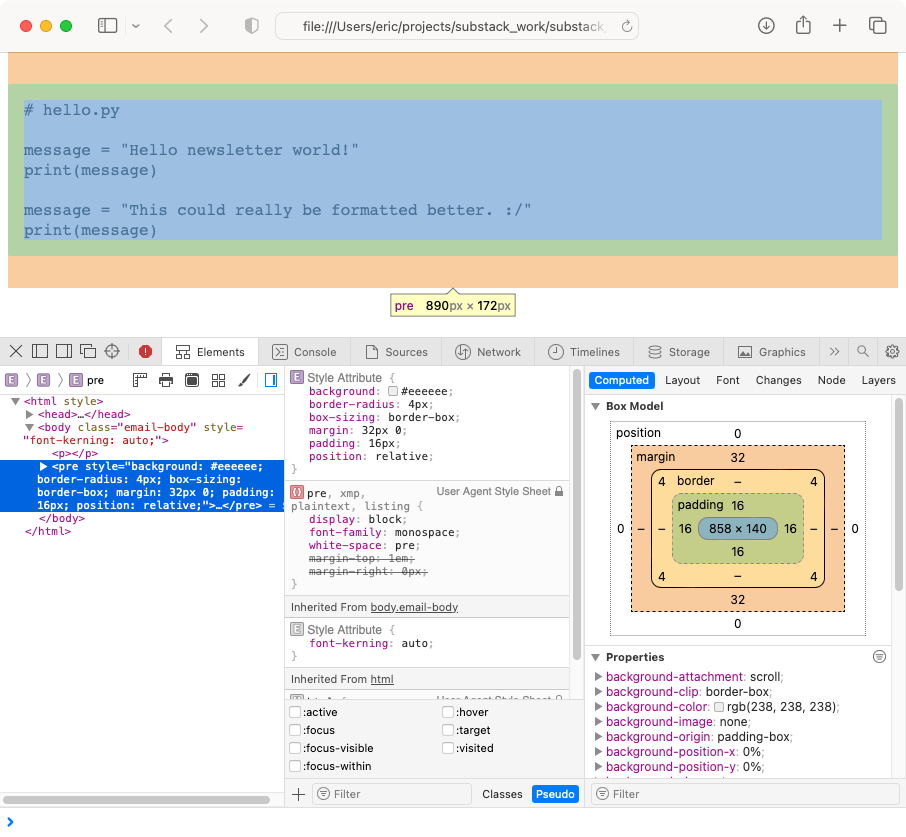
If you’re curious, here’s the current HTML that Substack generates for a code block. It’s structured like this:
<pre style="..."><code style="..."># hello.py
message = "Hello newsletter world!"
print(message)
message = "This could really be formatted better. :/"
print(message)</code></pre>The entire contents of the code block are wrapped in <pre> and <code> tags.
We want the title to be on its own line, so we’ll pull that out of the code block and redefine it as a <p> element. We’ll then move the <pre><code> tags to the next line:
<p style="background: #dddddd; padding: 5px 5px 5px 10px; margin-bottom: -32px; border-radius: 4px 4px 0 0; font-weight: bold; font-size: 14px;">hello.py</p>
<pre style="..."><code style="...">message = "Hello newsletter world!"
print(message)
message = "This could really be formatted better. :/"
print(message)</code></pre>The style rules in test_email_modified.html result in a title bar that sits neatly above the code block:

I don’t particularly like the font used in the title bar here, but I’m not sure if it’s going to look like that in the email viewer. This is the effect I was looking for, and it’s a significant improvement over the current options for including a filename.
Outlining the parser
Now we have some clarity in how we’d like to style the code blocks. Here’s what we’ll do to actually write the parser:
Define a syntax for indicating filenames. We’ll use the convention
### title="hello.py"Open a draft post that includes a code block in Substack’s editor. We’ll view the source and save the raw post data to a file. Substack works with a cleaner version of this data, so we’re not using anything they don’t have access to.
Write a Python program to do the following:
Read the raw post data and the template.
If the first line of a code block includes a title, rewrite that line as a
<p>element with the style we just created. Then rewrite the next line as the first line of a<pre><code>block.Insert these lines into the template, and save the resulting file under a new name.
View the resulting .eml file and see if the rendered code block is an improvement on what Substack currently generates.
Raw post data
Here’s the Substack editor with the test post open, and the inspector highlighting the post body:
Here’s the source for the test post itself:
# raw_post.html

<p>Here's a simple code block:  </p>
<pre><code>### title="hello.py"
message = "Hello newsletter world!"
print(message)

message = "This could really be formatted better. :/"
print(message)</code></pre>
<p>It would be nice to separate the filename from the code, and add some line numbers.</p>
<p>
These are the lines we’re going to parse, and insert into my_template.eml. This is an extremely simplified version of what Substack does with this same data.
Writing the parser
Now we have all the pieces in place to write the parser. We’ll first make sure the parser can generate a valid .eml file from the raw post data, without making any changes. Once that’s working, we’ll modify the post to include the new style rules.
Here’s the first part:
# email_parser.py

"""Parse raw post data, and generate neatly formatted
code block titles.
"""

from pathlib import Path

# Read post file and template file.
post = Path('raw_post.html').read_text()
template = Path('my_template.eml').read_text()
We read the raw post data, and load the template as well. Now we’ll start to work with individual lines from the post data:
...
# Loop over the lines in the raw post.
# When we get to a code block, look for a title.
# If we find a title, rewrite that line and the
#   next line.
modified_lines = []
lines = post.split("\n")
lines_iter = iter(lines)
We make a list called modified_lines, to store the lines we want to insert into the template. We split the post body into a list of lines, and then create an iterator object called lines_iter.
...
lines_iter = iter(lines)

while True:
    try:
        line = next(lines_iter)
    except StopIteration:
        break
    else:
        # Process lines here.
        pass
If you haven’t used an iterator before, calling next(lines_iter) will always give you the next line from the post, until there are no lines left in the post. To use the iterator, we set up an infinite while loop. On each pass through the loop, we try to pull out another line from the post. If we get a StopIteration error, there are no more lines so we break out of the loop. If the try block is successful, execution drops to the else block, where we’ll process the lines.
Now we should be able to process all the lines, without changing them yet, and see if we can generate a valid .eml file:
...
from pathlib import Path

def process_code_block(line, lines_iter, modified_lines):
    """Check for a title, and convert as needed."""
    modified_lines.append(line)

# Read post file and template file.
...

while True:
    try:
        line = next(lines_iter)
    except StopIteration:
        break
    else:
        if "<pre><code>" in line:
            process_code_block(line, lines_iter, modified_lines)
        else:
            # Keep the line as is.
            modified_lines.append(line)

# Write the modified lines into the template.
post_html = "\n".join(modified_lines)

eml_string = template.replace('post_body', post_html)

output_file = Path('output_files/modified_test_email.eml')
output_file.write_text(eml_string)
To understand the changes here, start with the else block in the while loop. If the current line contains the tags <pre><code>, then we’re looking at the first line of a code block. We need to process the code block, so we call a new function process_code_block(). If the line doesn’t have these tags, we’ll just append the line to modified_lines without taking any further action.
For now, process_code_block() does the same thing: it appends the current line to modified_lines without making any changes. Once we know this structure is generating a valid .eml file, we’ll finish writing this function.4
The rest of the code here writes the modified lines into the template. We create a new string called post_html, which is just the modified lines we’ve generated joined with newlines.5 We create a second string called eml_string, which is the entire contents of the template, with 'post_body' replaced by the modified lines we just generated. (This is how we “insert” our modified lines into the template.)
Finally, we create a new file called modified_test_email.eml, and write eml_string to that file.
Now we can use Quick Look to see if modified_test_email.eml is a valid email file:
We haven’t added any style rules to the raw post data, so this doesn’t look good yet, but it’s a valid enough .eml file that Quick Look can render it. If we got an error at this point, it would be much easier to do some troubleshooting without the added complexity of having modified lines already.
Now we can modify the first two lines in the code block, if a title is included in the first line:
def process_code_block(line, lines_iter, modified_lines):
    """Check for a title, and convert as needed."""
    if "### title" in line:
        # Convert the first line to the new title style.
        new_line = get_title_line(line)
        modified_lines.append(new_line)

def get_title_line(line):
    """Generate a formatted title line."""
    # Remove the <pre><code> blocks.
    line = line.replace("<pre><code>", "")

    # Get just the title; strip syntax and quotes.
    title = line.replace("### title=", "")
    title = title.replace('"', '')
    title = title.replace("'", "")

    # Define style rule.
    style_rule = '<p style="background: #dddddd; \
      padding: 5px 5px 5px 10px; \
      margin-bottom: -32px; \
      border-radius: 4px 4px 0 0; \
      font-weight: bold; \
      font-size: 14px;">'

    return f"{style_rule}{title}</p>"
Since the structure of the overall program is working, we can just focus on the function process_code_block(), and any helper functions we need to add. Because we have a working program now, we can also run the program and verify that the title is being rendered correctly before moving on.
The function process_code_block() checks to see if the line it was passed contains a title, indicated by ### title. If it does, it calls get_title_line() and appends the new version of the line to modified_lines.
The function get_title_line() does several things to generate the correctly formatted title. It removes the <pre><code> tags, because we’re going to move them to the next line. Then it pulls the title out, by getting rid of the ### title= syntax and the quotes that wrapped the title. We assign the <p> tag with the correct style to style_rule. Finally, it returns a string containing the opening <p> tag with the style applied, the title, and the closing </p> tag.
We should be able to preview the output file modified_test_email.eml, and see a correctly styled filename. It seems to work:
This doesn’t look great overall, but that’s because we’ve gotten rid of the <pre><code> tags and haven’t put them back in yet. The thing to notice here is that the title bar looks correct. There’s a dark gray box most of the width of the message, with a bold hello.py title. Let’s keep going.
Now we need to add the <pre><code> blocks back in, on the next line in the code block. We also need to add Substack’s style rules to these tags:
def process_code_block(line, lines_iter, modified_lines):
    """Check for a title, and convert as needed."""
    if "### title" in line:
        # Convert the first line to the new title style.
        new_line = get_title_line(line)
        modified_lines.append(new_line)

        # Add the <pre><code> tags to the next line,
        #   and then add styles.
        line = next(lines_iter)
        new_line = f"<pre><code>{line}"
        new_line = add_codeblock_styles(new_line)
        modified_lines.append(new_line)

def get_title_line(line):
    ...

def add_codeblock_styles(line):
    """Add Substack's codeblock styles."""
    pre_style = '<pre style="background: #eeeeee; \
      border-radius: 4px; box-sizing: border-box; \
      margin: 32px 0; padding: 16px; \
      position: relative;">'
    code_style = '<code style=3D"font-size: 16px; \
      font-weight: 500; line-height: 20px; \
      white-space: pre-wrap;">'

    line = line.replace("<pre>", pre_style)
    line = line.replace("<code>", code_style)

    return line
The new code in process_code_block() shows why we needed to use an iterator instead of a simple for loop. Before we leave this function, we need to grab the next line and modify it to include the <pre><code> tags. If we were in a for loop, we’d have to do some gymnastics to keep track of exactly when to make this change. With an iterator, we can grab the next line any time we want by calling next().
To modify the new first line of the code block, we first insert the <pre><code> tags at the beginning of the line. Then we call add_codeblock_styles(). (This approach will let us add these styles to code blocks that don’t have the ### title syntax as well.)
The function add_codeblock_styles() is simpler than it looks. It assigns the <pre> and <code> tags, with their style rules, to pre_style and code_style. It then replaces the unstyled tags with these styled tags.
We’re just about finished; when we run this code, we see the entire code block rendered correctly:

This is exactly what we were hoping to produce! (The paragraphs outside the code block haven’t had Substack’s style rules applied, because we’re only focusing on the code block here.)
The only thing to add is one more section to process_code_block(), to handle the case where the code block doesn’t have a title:
def process_code_block(line, lines_iter, modified_lines):
    """Check for a title, and convert as needed."""
    if "### title" in line:
        ...
    else:
        # There's no title, but we still need
        #   to add Substack's codeblock styles.
        new_line = add_codeblock_styles(line)
        modified_lines.append(new_line)
Remember that process_code_block() was called whenever a line was found in the raw post data containing the <pre><code> tags. The raw post data doesn’t have any style rules applied, so we need to add them in if we want this parser to work on code blocks that don’t have titles. This block calls add_codeblock_styles() on the first line of each untitled block, and adds the correctly styled line to modified_lines.
Testing this version of the parser against raw_post_without_title.html shows a default Substack code block.
Conclusions
Code blocks on the modern web are beautiful and functional. Code blocks in most email newsletters are quite plain, and difficult to use well as a result. Small changes like the ones discussed here can go a long way towards improving how we discuss code in this medium.
Arguments about email size don’t seem prohibitive for adopting this kind of improvement. The file test_email.eml was 19.8kB, and the file modified_test_email.eml was 19.9kB. Adding a title bar does little to make emails heavier, especially compared to the amount of CSS that already ships with each email.
Arguments about rendering limitations in email clients don’t seem to block adoption either, although I’m less certain about this because I don’t have access to a variety of clients for testing. If rendering inconsistencies keep the style used here from working, I would guess there’s another approach that does work reasonably well. For example if it’s impossible to neatly place the title bar at the exact top of a code block consistently across all clients, I could imagine coming up with a style that still places it directly above the code block, in a way that it’s more visually connected with the listing than with the post body text.
None of this would impact plaintext emails. When plaintext emails are rendered by the parser, code block titles can be listed as title: hello.py, or something similar. This is also an improvement over the current options.
When showing the development of a file over a series of code blocks, the best way I can find to indicate which lines have changed between listings is to make those lines bold. A similar approach to parsing would make it possible to support highlighted lines as well as titles. For example if ### hl_lines="3,4" appears on the first line of a code block, it could be rendered like this:
This is a much better way of indicating which lines have been modified since the last listing was shown. A similar approach might allow support for line numbers as well, but you have to make sure the line numbers aren’t included when the code in a block is copied.
I recognize that Substack’s parsing and delivery process is quite complicated, which is part of why I’m really happy with what they’ve already done. We get to write in a nice editor, and they do all the work of turning our words into emails and posts that can be viewed in apps and browsers. However, I do think there’s some room for small changes in how code blocks are presented, that would significantly improve the quality of communication in technical newsletters.
Resources
You can find the code files from this post in the mostly_python GitHub repository.
This didn’t work at first, on .eml files downloaded directly from Gmail. The line endings in the original downloaded file were
\r\n, and the Quick Look previewer doesn’t seem to work well with those endings. One way to get rid of them is to open a new file in a text editor, and paste the text from the original .eml file into this new file. When you save it, the line endings will be converted to a format that’s compatible with the Quick Look previewer. ↩The characters
3Dappearing several times here are one of the differences between the .eml file and a typical HTML file. See this Stack Overflow question for more. ↩To convert test_email.eml to test_email.html, first remove everything up to the line that starts with
<html style=...>. Then remove the occurrences of3Dthat are sprinkled throughout the HTML. ↩One of my main goals in writing Mostly Python is to show people the process of using Python to solve real-world problems, not just finished programs that already work. I made a number of mistakes in getting this parser to work, but the process shown here got me to a working version reasonably efficiently.
If you’re working in an unfamiliar context, you shouldn’t feel bad about making a bunch of mistakes either. If you follow an incremental process like what you see here, you’ll be in a better position to troubleshoot the errors that do come up. ↩
If you haven’t used
join()before, it’s worth explaining because the syntax isn’t obvious. To usejoin(), which is a string method, you choose a string that you want to place between every item in a list. You provide the string, thejoin()method, and the sequence you want to work with. Python then creates a new string made of each item from the list, with the string placed between the items. Here’s a quick example: ↩>>> dogs = ['willie', 'peso', 'palmer'] >>> ' '.join(dogs) 'willie peso palmer' >>> ', '.join(dogs) 'willie, peso, palmer' >>> '\n'.join(dogs) 'willie\npeso\npalmer'