Testing a book's code, part 4: Testing Matplotlib data visualizations
MP 80: Modifying files and making assertions about images.
Note: This is the fourth post in a series about testing.
In the last post we tested a game built with Pygame, and added a CLI argument to specify any version of Pygame we want. In this post we’ll test the output of data visualization programs that use Matplotlib. In the end, we’ll be able to run tests against any version of Matplotlib as well.
Testing data visualization programs is interesting, because there’s a variety of output. There’s some terminal output that’s fairly straightforward to make assertions about, but the graphical output is much more interesting to test. Let’s dig in.
Testing one Matplotlib program
Here’s the first program we want to test, called mpl_squares.py:
import matplotlib.pyplot as plt

input_values = [1, 2, 3, 4, 5]
squares = [1, 4, 9, 16, 25]

plt.style.use('seaborn-v0_8')
fig, ax = plt.subplots()
ax.plot(input_values, squares, linewidth=3)

# Set chart title and label axes.
...

plt.show()
This code defines a small dataset, and then generates a line graph:
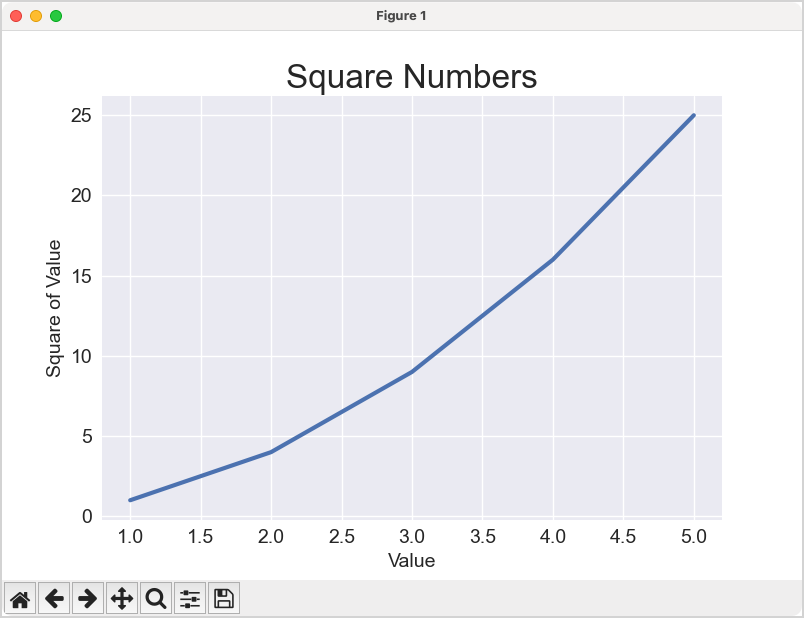
The call to plt.show() causes Matplotlib’s plot viewer to appear. This is great for introducing people to plotting libraries, but it’s problematic in an automated test environment. We don’t really want to call plt.show() in a test run.
Rewriting the file before testing it
We won’t test this file directly because we don’t want to call plt.show(), and we can’t change the files in the book’s repository. However, we can copy them to a different directory outside the repository and then do whatever we want with them. So let’s modify the program to write the plot as an image file. We can then make assertions about the freshly-generated image file.
We’ll start by making a new test file, called test_matplotlib_programs.py. Here’s the first part of the test for mpl_squares.py:
from pathlib import Path
import shutil

def test_mpl_squares(tmp_path, python_cmd):
    # Copy program file to temp dir.
    test_file = "chapter_15/.../mpl_squares.py"
    src_path = Path(__file__).parents[1] / test_file

    dest_path = tmp_path / src_path.name
    shutil.copy(src_path, dest_path)

    # Replace plt.show() with savefig().
    contents = dest_path.read_text()
    save_cmd = 'plt.savefig("output_file.png")'
    contents = contents.replace("plt.show()", save_cmd)
    dest_path.write_text(contents)

    print(f"\n***** Modified file: {dest_path}")
The built-in pytest fixture tmp_path generates a temporary directory; there’s no need to make your own.1 We first copy the file we want to test, mpl_squares.py, to the temp directory using shutil.copy(). We then replace the plt.show() call with a call to plt.savefig(). This will write the output plot as an image file, instead of opening Matplotlib’s plot viewer.
Before going any further, we add a temporary line to show the path to the modified file, so we can make sure it was rewritten correctly:
$ pytest tests/test_matplotlib_programs.py -qs
...
***** Modified file:
  .../pytest-of-eric/pytest-383/test_mpl_squares0/mpl_squares.py
...
We can open this file just like any other .py file, and make sure it’s identical to the original mpl_squares.py except that for the call to savefig():
...
# Set size of tick labels.
ax.tick_params(labelsize=14)

plt.savefig("output_file.png")
This is correct, so we can move on.
Running the modified program
Now we can add some code to the test function to run the modified .py file, instead of the original program:
from pathlib import Path
import shutil, os

import utils

def test_mpl_squares(tmp_path, python_cmd):
    ...

    # Run program from tmp path dir.
    os.chdir(tmp_path)
    cmd = f"{python_cmd} {dest_path.name}"
    output = utils.run_command(cmd)

    # Verify file was created, and that it matches reference file.
    output_path = tmp_path / "output_file.png"
    assert output_path.exists()

    # Print output file path, so it's easy to find images.
    print("\n***** mpl_squares output:", output_path)
Before running the program, we call os.chdir() to change the working directory to the temp directory. When the modified version of mpl_squares.py is run, it should write a file called output_file.png to the temp directory. Before doing anything with the actual image that’s generated, we simply assert that this file exists. If it doesn’t get written for some reason, or it gets written to the wrong place, we want to know that.
We also print the output path, so we know exactly where to find the output image. I’m going to want to examine the generated image during some successful test runs and some failures. The default pytest output sometimes includes this information, but not always.
Running this program should generate an image just like the one that was shown in the Matplotlib viewer earlier:
$ pytest tests/test_matplotlib_programs.py -qs
***** mpl_squares output: /.../output_file.png
...
1 passed in 0.78s
The test passed, which should mean the output image was written to the temp directory, as expected.2
We can now go to this path and open the generated image, just like any image file:
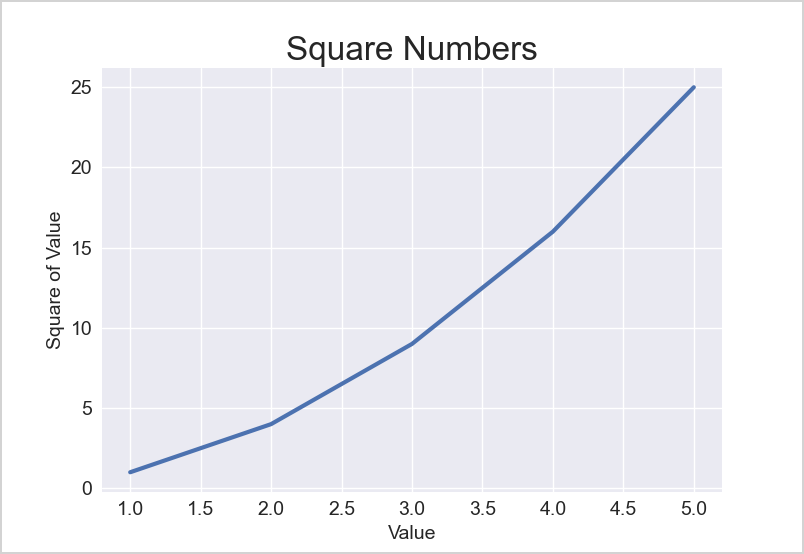
This image matches what was shown in the Matplotlib viewer, so it’s correct.
The nice part is, we can use this file as the reference file for the rest of the test. We don’t need to go run the original mpl_squares.py separately and copy the output as a reference file. The test suite just ran the code for us, and the output is correct. So we make a folder called tests/reference_files/, and copy this image to that new folder. I renamed the reference file mpl_squares.png, to make it straightforward to connect each reference file with the .py file that generated it.
Verifying the generated output
We can now make an assertion that the image that’s generated is the correct one. We’ll do that by comparing the image that’s generated in each new test run against the one that we just copied into reference_files/:
from pathlib import Path
import shutil, os, filecmp

import utils

def test_mpl_squares(tmp_path, python_cmd):
    ...

    reference_filename = src_path.name.replace(".py", ".png")
    reference_file_path = (Path(__file__).parent
            / "reference_files" / reference_filename)
    assert filecmp.cmp(output_path, reference_file_path)

    # Verify text output.
    assert output == ""
The filecmp.cmp() function compares two files, and returns True if they “seem equal”. Comparing files, especially image files, can get complicated. I’m going to start with this simple function, and only do a more complicated comparison if the need arises.
We’re running mpl_squares.py, and the reference file is mpl_squares.png. So we build the reference filename by replacing .py with .png. We then build the path to the reference file. Once we have this, we can call filecmp.cmp() with the freshly-generated image file (at output_path), and the reference file (at reference_file_path). We also make an assertion that there’s no text output, which should be the case if everything worked:
$ pytest tests/test_matplotlib_programs.py -qs
***** mpl_squares output: /.../output_file.png
...
1 passed in 0.79s
This passing test should mean that the output file was generated, and it matches the reference image file.
Checking failures
We know the test suite is capable of failing. Before continuing, we should make sure this specific test can fail. One clear way to do that is to modify the data that’s used to generate the plot.
def test_mpl_squares(tmp_path, python_cmd):

    ...
    # Replace plt.show() with savefig().
    contents = dest_path.read_text()
    save_cmd = 'plt.savefig("output_file.png")'
    contents = contents.replace("plt.show()", save_cmd)

    # Uncomment this to verify that comparison
    #   fails for an incorrect plot image:
    contents = contents.replace("16", "32")

    dest_path.write_text(contents)
    ...
When we’re modifying the file to write an image instead of show the Matplotlib viewer, we can also modify the data. We’ll change the data point 16 to 32, which should change the plot image and cause a failure.
Let’s make sure that happens:
$ pytest tests/test_matplotlib_programs.py -qs
...
>   assert filecmp.cmp(output_path, reference_file_path)
E   AssertionError: assert False
1 failed in 0.82s
This step can seem unnecessary, but it’s not uncommon to see a test pass when it clearly should fail. This is especially true when writing a new kind of test. If a test is going to pass when it should fail, that’s a really important issue to identify early on. Otherwise your “passing” tests will give you a false sense of security about the state of your project. Beyond seeing the test failure, you may even want to look at the image that was generated and see that it’s incorrect in the way you expect it to be.
When you’ve proven your test can fail, make sure to comment out or remove the relevant lines. Then run your test once more and make sure it passes before moving on.
I will note that this test passes on Windows as well at this point (with the intentional failure commented out). That’s not always the case when making assertions about generated images. Sometimes there are slight differences in the way images are generated on different OSes, and you can’t rely on filecmp.cmp() for comparing images.
Adding a second test
The next test has the same structure as this first one, so let’s parametrize the existing test:
simple_plots = [
    "chapter_15/plotting_simple_line_graph/mpl_squares.py",
    "chapter_15/plotting_simple_line_graph/scatter_squares.py",
]

@pytest.mark.parametrize("test_file", simple_plots)
def test_simple_plots(tmp_path, python_cmd, test_file):
    # Copy program file to temp dir.
    src_path = Path(__file__).parents[1] / test_file
    ...
We make a list of the two files that need to be tested. We add the @pytest.mark.parametrize() decorator, and name the parameter test_file. We change the name of the test function to a more general test_simple_plots(), and add a parameter to accept the path to each test file.
In the function, all we have to do is remove the line where test_file was defined. The rest of the function is unchanged.
Now when we run this test module, the test for the first program passes but the second one fails. Just as before we can open the newly-generated output file, and copy it over to tests/reference_files/ once we verify that it’s correct. After doing this, both tests pass.
Testing code that deals with randomness
The next project we need to test is a program that plots random walks. In a random walk, you make a series of decisions. You can think of it like this: Make a dot on a piece of paper. Now roll a die to decide whether to go right or left. Roll a second time to decide how far to go in that direction. Roll two more times to decide whether to go up or down, and how far to go in that direction. Wherever you end up, make a second dot.
If you repeat these steps many times, you’ll have a random walk:
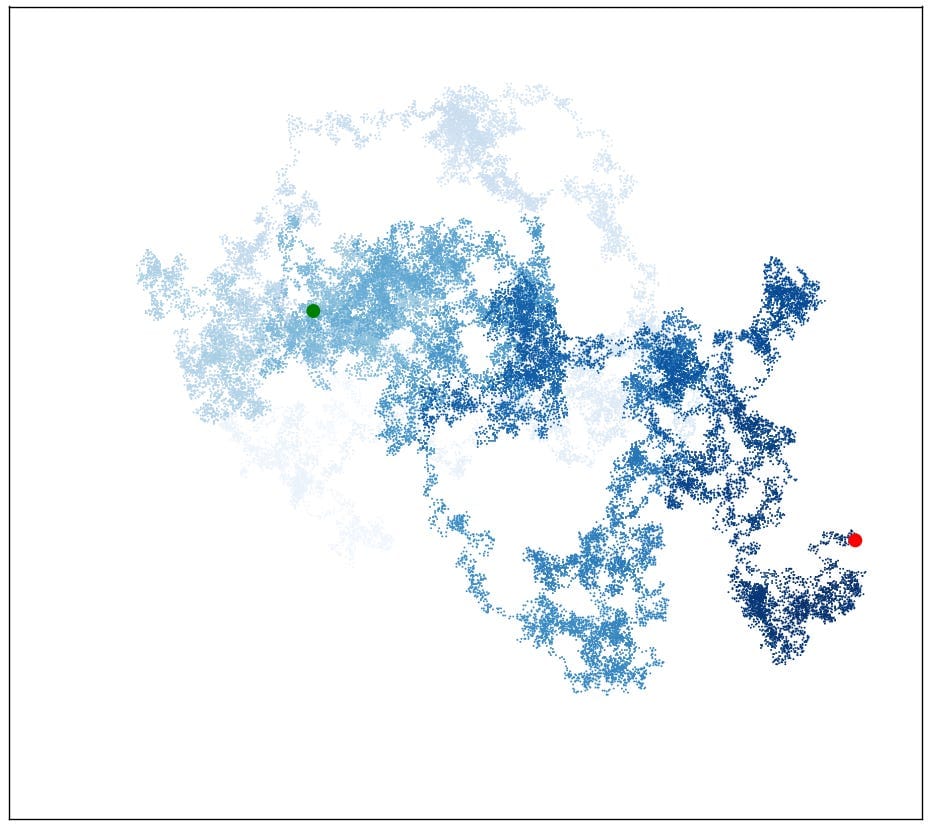
There are a couple challenges to testing this program. First, if we simply make a reference image and compare against that, the test will always fail because every new image is unique. Second, the program is set up with a while loop that keeps generating new walks until the user decides to quit.
To test this program, we’ll need to do three things:
- Give the random number generator a seed value, so it always generates the same sequence of numbers;
- Remove the
whileloop, so it only generates one plot; - Write the output to a file, instead of using Matplotlib’s viewer.
This is a longer test function, so we’ll develop it in sections. Here’s the first part:
def test_random_walk_program(tmp_path):
    # Copy rw_visual.py and random_walk.py.
    path_rwv = (Path(__file__).parents[1] /
        "chapter_15" / "random_walks" / "rw_visual.py")
    path_rw = path_rwv.parent / "random_walk.py"

    dest_path_rwv = tmp_path / path_rwv.name
    dest_path_rw = tmp_path / path_rw.name

    shutil.copy(path_rwv, dest_path_rwv)
    shutil.copy(path_rw, dest_path_rw)
This project consists of two files, random_walk.py and rw_visual.py. The first contains the class RandomWalk, and the second makes instances of this class and then generates plots. We copy both of these files to the temp directory.
You can run a specific test function with the -k flag. When developing a longer test function, I like to run it even before making any assertions, to make sure things are working:
$ pytest tests/test_matplotlib_programs.py -qs -k random_walk
.
1 passed, 2 deselected in 0.46s
Here we’re telling pytest to run any test functions that have random_walk in their names. We can see that one test passed, and two were ignored.
Now we need to modify rw_visual.py. Here’s the structure of that file:
# Keep making new walks, as long as the program is active.
while True:
    # Make a random walk.
    rw = RandomWalk(50_000)
    rw.fill_walk()

    # Plot the points in the walk.
    plt.style.use('classic')
    ...
    plt.show()

    keep_running = input("Make another walk? (y/n): ")
    if keep_running == 'n':
        break
We’ll remove the lines that relate to running the while loop, and unindent every line that we keep.
Here’s the code to make these modifications:
def test_random_walk_program(tmp_path):
    ...

    # Modify rw_visual.py for testing.
    lines = dest_path_rwv.read_text().splitlines()[:26]

    # Remove while line.
    del lines[4:6]
    # Unindent remaining lines.
    lines = [line.lstrip() for line in lines]
    # Add command to write image file.
    save_cmd = '\nplt.savefig("output_file.png")'
    lines.append(save_cmd)
    # Add lines to seed random number generator.
    lines.insert(0, "import random")
    lines.insert(4, "\nrandom.seed(23)")

    # Write modified rw_visual.py.
    contents = "\n".join(lines)
    dest_path_rwv.write_text(contents)
We first read in the lines from the original rw_visual.py, omitting the last few lines that call plt.show() and prompt the user about whether to make another walk. We then make a series of changes:
- Remove the line that starts the
whileloop, and the related comment. - Unindent the lines that were part of the
whileloop. - Add a call to
plt.savefig(). - Add lines to import the
randommodule, and callrandom.seed().
Now we can run this test again, and inspect the modified version of rw_visual.py:
import random
...

random.seed(23)

# Make a random walk.
rw = RandomWalk(50_000)
rw.fill_walk()

# Plot the points in the walk.
...

plt.savefig("output_file.png")
Calling random.seed() causes Python’s random number generator to return a consistent sequence of pseudorandom numbers. Every time seed() is called with the same value, the pseudorandom sequence starts over and returns the same sequence of numbers. That means we can run this file once to verify that it generates a random walk. Then we should be able to run it repeatedly, and always get the same image.
Let’s add the code to run the file, and see if it works:
def test_random_walk_program(tmp_path, python_cmd):
    ...

    # Run the file.
    os.chdir(tmp_path)
    cmd = f"{python_cmd} {dest_path_rwv.name}"
    output = utils.run_command(cmd)

    # Verify file was created, and that it matches reference file.
    output_path = tmp_path / "output_file.png"
    assert output_path.exists()

    # Print output file path, so it's easy to find images.
    print("\n***** rw_visual output:", output_path)
We add the python_cmd fixture to the function’s parameters. We call os.chdir() any time we’re writing a file during a test run, so we only ever write to temp directories. We make the same assertion that we did earlier that the output file exists, and print its path as well.
Here’s the resulting image, which is the same every time the test is run:
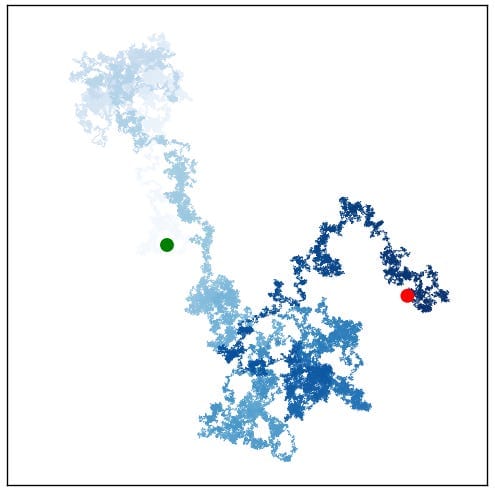
23.Now we can copy this image to the reference files as rw_visual.png, and make an assertion that the test file matches the reference file:
def test_random_walk_program(tmp_path, python_cmd):
    ...
    reference_file_path = (Path(__file__).parent /
        "reference_files" / "rw_visual.png")
    assert filecmp.cmp(output_path, reference_file_path)

    # Verify text output.
    assert output == ""
This test passes, but we should make sure it can fail. If we comment out the line that seeds the random number generator we should see a different image in output_file.png, and the test should fail. Here’s the resulting image on this test run, which causes the test to fail:
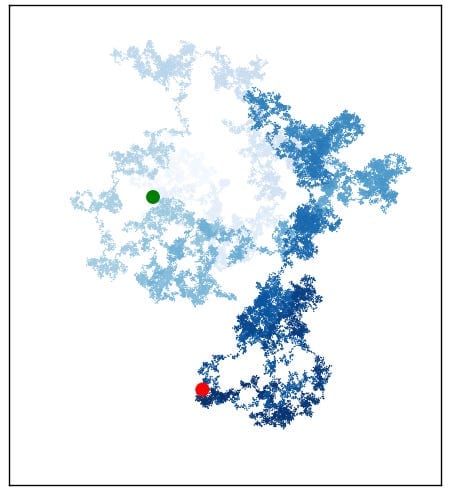
random.seed(23), you’ll get the a new random walk and the test will fail.If you’re wondering how a test like this could pass when it shouldn’t, here’s one simple mistake that would cause that to happen:
assert filecmp.cmp(output_path, output_path)Here we’re accidentally comparing the output file to itself, rather than to the reference file. This assertion will always pass. Every programmer makes mistakes like this at times. If you’re willing to prove that most of your tests can fail when you write them, you should help yourself avoid the more serious consequences of these kinds of mistakes.
Testing weather-focused programs
The last set of Matplotlib programs all focus on plotting weather data. For these tests we’ll need to copy the program files and the data files, and then examine the resulting plot images.
Here’s the new test function, up to the point where it copies the program file and the data file to the temp directory:
weather_programs = [
    ("sitka_highs.py", "sitka_weather_2021_simple.csv", ""),
]

@pytest.mark.parametrize("test_file, data_file, txt_output",
    weather_programs)
def test_weather_program(tmp_path, python_cmd,
        test_file, data_file, txt_output):

    # Make a weather_data/ dir in tmp dir.
    dest_data_dir = tmp_path / "weather_data"
    dest_data_dir.mkdir()

    # Copy files to tmp dir.
    path_py = (Path(__file__).parents[1] /
        "chapter_16"/ "the_csv_file_format" / test_file)
    path_data = path_py.parent / "weather_data" / data_file

    dest_path_py = tmp_path / path_py.name
    dest_path_data = (dest_path_py.parent /
            "weather_data" / path_data.name)

    shutil.copy(path_py, dest_path_py)
    shutil.copy(path_data, dest_path_data)
I know I’m going to need to parametrize this test, so I use that structure even though I’m only writing one test at the moment. The parametrized data contains tuples of three elements: the program file, the data file, and the text output for that program.
We make a weather_data/ directory in the temp directory, and then copy the necessary files to the corresponding locations in the temp directory. There’s some code in here that could probably be refactored with the other test functions, but it’s not enough to sort through at the moment. This is the last function we’ll write in this module, so I’d probably spend more time refactoring than I’d save.
It’s not a bad idea to run the test, and make sure everything is copying over to the temp directory correctly. It’s working at this moment, but I’ve certainly gotten to this point and found data files in the wrong places, among other minor issues.
Now we’ll modify the program to write an image file, and run the program:
def test_weather_program(...):
    ...

    # Write images instead of calling plt.show().
    contents = dest_path_py.read_text()
    save_cmd = 'plt.savefig("output_file.png")'
    contents = contents.replace("plt.show()", save_cmd)
    dest_path_py.write_text(contents)

    # Run program.
    os.chdir(tmp_path)
    cmd = f"{python_cmd} {dest_path_py.name}"
    output = utils.run_command(cmd)

    # Verify file was created, and that it matches reference file.
    output_path = tmp_path / "output_file.png"
    assert output_path.exists()

    # Print output file path, so it's easy to find images.
    print(f"\n***** {dest_path_py.name} output:", output_path)
This works:
$ pytest tests/test_matplotlib_programs.py -qs -k weather_program
***** sitka_highs.py output: /.../output_file.png
...
We can navigate to the temp directory, and look at the plot image that was generated:
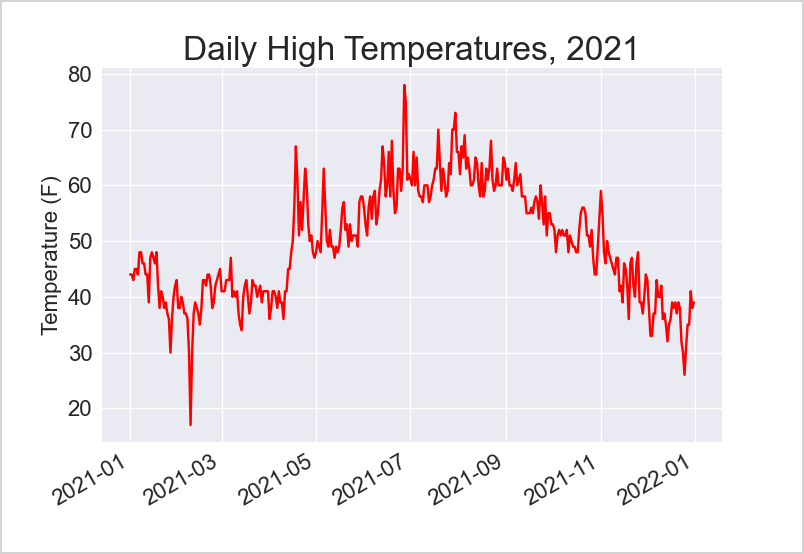
This is a plot of the high temperates for one year in Sitka, Alaska. We can now copy this image to tests/reference_files/, as sitka_highs.png.
Here’s the rest of the code to verify the output:
def test_weather_program(...):
    ...

    # Check output image against reference file.
    reference_filename = dest_path_py.name.replace(".py", ".png")
    reference_file_path = (Path(__file__).parent
            / "reference_files" / reference_filename)
    assert filecmp.cmp(output_path, reference_file_path)

    # Verify text output.
    assert output == txt_output
With the reference file in place, this test passes.
Testing all weather-related programs
There are two more weather-focused visualization programs that need to be tested. With parametrization already in place, we can just add the relevant information to the test data:
weather_programs = [
    ("sitka_highs.py", ...),
    ("sitka_highs_lows.py", ...),
    ("death_valley_highs_lows.py", ...)
]
The first time you run the test module with this additional data, the two new tests will fail because the reference files don’t exist yet. After you verify that those images are correct and copy the image files to tests/reference_files/, all the tests should pass.
Testing different versions of Matplotlib
One of the main benefits of having this test suite is the ability to rapidly test the book’s code against any version of any library. So let’s add a CLI arg to run the following test:
$ pytest tests/test_matplotlib_programs.py --mpl-version x.y.zThe structure for this is identical to what we did in the Pygame test. Here’s the update to conftest.py:
def pytest_addoption(parser):
    parser.addoption(
        ...

    parser.addoption(
        "--matplotlib-version", action="store",
        default=None,
        help="Matplotlib version to test"
    )
We make a second call to parser.addoption().
Here’s the update to test_matplotlib_programs.py:
@pytest.fixture(scope="module", autouse=True)
def check_matplotlib_version(request, python_cmd):
    """Check if the correct version of Matplotlib is installed."""
    utils.check_library_version(request, python_cmd, "matplotlib")
We add a single fixture at the top of the file, with autouse=True. This fixture will make sure the correct version of Matplotlib is installed every time this module is run. The cleanup work is already in place, so at the end of every test run the virtual environment should be reset to its original state.
Also note that you have to update the requirements.txt file, because that’s what’s used to reset the test environment after installing different versions of a library.
This code works, but interestingly all of the tests fail when run with a different version of Matplotlib:
$ pytest tests/test_matplotlib_programs.py -qs
    --matplotlib-version 3.7.0
*** Installing matplotlib 3.7.0
...
Successfully installed matplotlib-3.7.0
*** Running tests with ['matplotlib==3.7.0']

--- Resetting test venv ---
Successfully installed matplotlib-3.8.2
--- Finished resetting test venv ---

***** Tests were run with: Python 3.11.5

6 failed in 7.65s
The test output shows that Matplotlib 3.7.0 was installed for the test run, and 3.8.2 was reinstalled at the end of the test run.3
However, every test failed with the same issue:
>   assert filecmp.cmp(output_path, reference_file_path)
E   AssertionError: assert False
Every test is failing the comparison against the reference image.
Down the image-comparison rabbit hole
I’ve written tests before that involve comparing generated images against reference files. When developing tests like this, you can find that images generated on one OS differ slightly from images generated on a different OS, even when all the code and library versions are identical. There are many underlying utilities involved in image generation, so there are lots of little things that can result in images that look the same, but don’t match in a pixel-by-pixel or byte-by-byte comparison.
There are a variety of solutions to this problem. One of the simplest approaches is to analyze all the pixel data in each image, and assert that the data for the generated image can differ from the data in the reference image up to a certain threshold. I wrote one of these comparisons for this test module, only to find that I could push the threshold to zero and the tests would still pass. That meant the generated images do match the reference files in a pixel-by-pixel comparison.
This led me to look at the metadata for each file. It turns out Matplotlib writes its version number into the metadata when you call savefig() with the default options. On macOS, you can see some of this data by opening an image file in Preview and clicking Tools > Show Inspector:
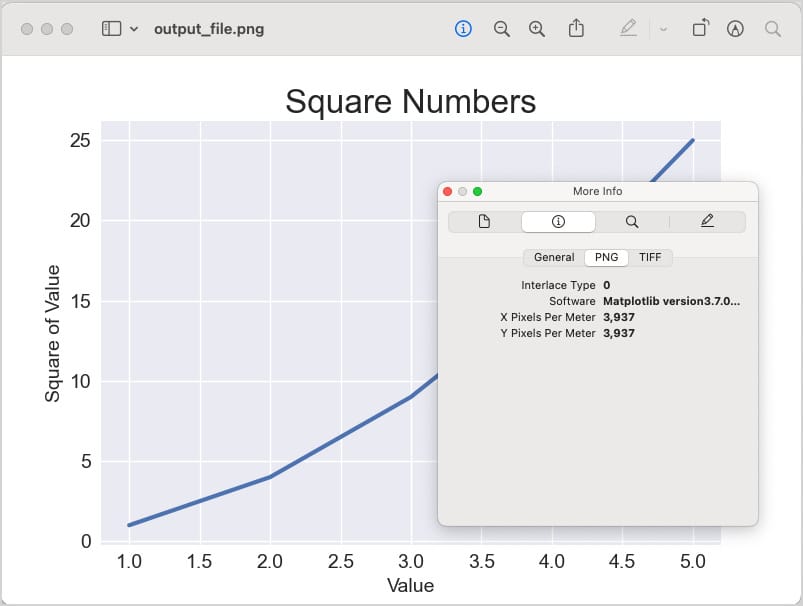
My first solution was to use Pillow to strip the metadata from both the generated image and the reference file before making the comparison. But there’s a simpler solution that doesn’t require bringing in Pillow.
Here’s how we’ve been replacing plt.show() with a call to savefig():
save_cmd = 'plt.savefig("output_file.png")'Matplotlib allows you to make changes to the metadata in a call to savefig(). Let’s remove the Software metadata entirely:
save_cmd = 'plt.savefig("output_file.png", metadata={"Software": ""})'After making this change, all the tests will fail because the reference files still have Software metadata. After copying over the new output files to the tests/reference_files/ directory, all tests pass. Most importantly, all tests pass for multiple recent versions of Matplotlib:
$ pytest tests/test_matplotlib_programs.py -qs
*** Running tests with matplotlib==3.8.2
...
6 passed in 3.48s

$ pytest tests/test_matplotlib_programs.py -qs
    --matplotlib-version 3.7.0
*** Installing matplotlib 3.7.0
*** Running tests with matplotlib==3.7.0
...
6 passed in 6.81s
Parallelizing tests
The full test suite now takes a while to run:
$ pytest -qs
...
67 passed in 14.24s
The tests take longer if I specify a particular version, and longer on my Windows VM.
You can speed most test suites up by installing pytest-xdist, and then running tests in parallel:
$ pip install pytest-xdist
$ pytest -n auto
10 workers [67 items]
67 passed in 11.29s
The pytest-xdist plugin adds support for parallelization to pytest. The -n auto flag tells pytest to figure out the number of workers to use automatically, based on your system’s resources.
On my main system, this only drops a few seconds off the basic full test run. But on my Windows VM, tests are cut from about 22 seconds to 15 seconds. That will help as we finish the test suite and it grows even longer.
I will note, however, that I sometimes run into failures that I haven’t resolved yet when running tests in parallel with version flags for specific libraries. I would guess there’s an issue with the workers being spawned in a virtual environment, and then having that environment change during the test run. If this were a more significant issue, I’d probably create a temp virtual environment for tests that request a specific version. We’ll use that approach later when testing the Django project.
Also note that the -s flag does not work with pytest-xdist. If you need the output generated by that flag, try to run just the test or tests you’re focusing on.
Conclusions
The main reason I love testing is because it lets me enjoy life away from a computer more fully. When I step away from technical work for a while, I like having reasons to be confident that things won’t break too badly while I’m off doing other things.
But a well-thought-out test suite goes beyond helping to prevent regressions. When people do report issues, a test suite that uses temp directories also gives you lots of artifacts to inspect, and even code files that you can jump in and run manually.
I also love (most of the time) that testing tends to bring up interesting rabbit holes that I’d otherwise never look into. I didn’t like having to spend half a day learning about metadata, but in the end it feels good to understand what can go wrong when comparing files, and why the current version of this test suite no longer faces that issue. Files often seem like little black boxes with some information in them. But deep dives regularly show how much hidden information is often packed into those black boxes.
The next time anyone tells you testing is boring, give them two image files with identical pixels but metadata that differs slightly, and ask them how to write a good comparison between those two files. :)
Resources
You can find the code files from this post in the mp_testing_pcc_3e GitHub repository.
It makes the temporary directory in a folder named something like pytest-of-eric/. pytest cleans these directories out on a regular basis, so you don’t have to worry about deleting temp directories after repeated test runs. ↩
On my first attempt, this didn’t work because I hadn’t installed Matplotlib to the test environment yet. The output wasn’t nearly as obvious as it is when you run a .py file directly with a bad import. pytest was able to run, and it starts to run the tests, but the actual import failure happens in a subprocess call. The traceback indicating the root issue is buried deep in pytest’s output, and it looks like this:
...popenargs = (['/.../.venv/bin/python', 'mpl_squares.py'],)
kwargs = {'stderr': -1, 'stdout': -1, 'text': True}
process = <Popen: returncode: 1 args: ['/.../.venv/b...>, stdout = ''
stderr = 'Traceback (most recent call last):\n
File "/.../p...s.py", line 1, in <module>\n    import matplotlib.pyplot as plt\nModuleNotFoundError: No module named \'matplotlib\'\n'
retcode = 1
...
The difficulty is that pytest has captured all this output, and it’s presenting it as part of a dump of everything that happened around the failure point.
There are a number of strategies you can use to sort out these issues. For example you can run pytest in a more verbose mode, or you can go into the temp directory after the test fails and try to run mpl_squares.py directly. ↩
In the previous post I mentioned that this version-handling code wasn’t working on Windows. It’s working for Matplotlib, and I’m still not sure what was causing that issue previously. ↩
