Django from first principles, part 16
MP 110: Allowing users to create their own blogs.
Note: This is the 16th post in a series about building a full Django project, starting with a single file. This series will be free to everyone, as soon as each post comes out.
In the last post we connected each blog with a specific user. In this post, we'll build a page where users can create their own blogs. This is one of the last steps in giving users all the control they need to fully use the site we've been building.
The central role of forms
Most content on the web is entered through forms. A form, as mentioned when we were building the registration page, is a block of code that allows users to enter information on a web page. Django makes it fairly straightforward to generate the forms you need, based on the models you've already defined.1
We want users to be able to create their own blogs, which means they need to provide the information that's specified in the Blog model. Here's the relevant part of that model:
class Blog(models.Model):
    title = models.CharField(max_length=200)
    description = models.TextField()
    date_added = models.DateTimeField(auto_now_add=True)
    owner = models.ForeignKey(User, on_delete=models.CASCADE)
There are four fields in the Blog model, but users only need to provide two of those fields: the blog's title, and a description. Django sets the date_added field automatically, and we'll assign the blog to the currently authenticated user.
When you're creating a form based on a single class, you can use Django's ModelForm. You specify the model you want your form to be based on, and which fields should appear in the form. Django then generates the HTML needed to render the form.
All the pages we've built so far required three steps: define a URL pattern, write a view function, and write a template. We'll follow those same steps now, with one additional step: we'll start by writing a form that can be used on the page.
The BlogForm class
We need to write a form for creating blogs, which means we should be working in the blogs/ directory. In that folder, make a new file called forms.py:
from django import forms

from .models import Blog

class BlogForm(forms.ModelForm):
    class Meta:
        model = Blog
        fields = ["title", "description"]
We import Django's forms module, and the Blog model. We write a new class called BlogForm, which inherits from ModelForm. The nested Meta class tells Django exactly what to include in the form. The last two lines are the most important: we specify that the form should be based on the Blog model, and then specify that two fields should be included:title and description.
The new_blog URL
Here's the URL we'd like to use for the page that lets users create a new blog:
http://localhost:8000/new_blog/
We don't need any URL parameters, because we're not pulling any existing data into this page. We're just showing and processing a form for creating new data.
Here's the URL pattern, in blogs/urls.py:
urlpatterns = [
    ...
    path("new_blog/", views.new_blog, name="new_blog"),
    path("", views.index, name="index"),
]
When users request the URL shown above, Django will call the new_blog() view function. We can refer to this URL anywhere in the project using the name new_blog.
The new_blog() view function
We need to write a view function for the new_blog page. The new_blog() function will serve two purposes: present a blank form when the page is first loaded, and process the form when the submit button is pressed. This is just like the work we did when building the register() view function earlier.
Here's the new view function, in blogs/views.py:
from django.shortcuts import render, redirect

from .models import Blog, BlogPost
from .forms import BlogForm

...
def new_blog(request):
    if request.method != "POST":
        form = BlogForm()
    else:
        form = BlogForm(data=request.POST)
        if form.is_valid():
            new_blog = form.save(commit=False)
            new_blog.owner = request.user
            new_blog.save()
            return redirect("blogs:blogs")

    context = {"form": form}
    return render(request, "blogs/new_blog.html", context)
The if block catches all requests other than POST requests. This is usually a GET request, where a user has just opened the new_blog page and needs to see a blank form. We make an instance of BlogForm with no arguments, and then drop to the last two lines of the function. The blank form is added to the context dictionary, and the render() call builds the page.
A POST request means the user has just submitted a form. The else block, which only runs for POST requests, makes an instance of BlogForm with the request.POST data. If the form.is_valid() check fails, execution immediately drops to the last two lines, and the same page is re-rendered with an appropriate error message.
If the form is valid, we need to create a new blog and save it to the database. It's helpful to focus on the form processing logic one line at a time:
new_blog = form.save(commit=False)
The is_valid() check passed, so we know the user has provided an appropriate title and description for the blog. But Django doesn't know which user to assign this blog to. If you call form.save() without any arguments at this point, you'll get a database error.
Calling form.save() with the commit=False argument prevents the data from immediately being saved to the database. Instead, the function returns an instance of the model the form was based on. In this case it returns an instance of Blog, which we assign to the variable new_blog. The variable new_blog is just a Python object, and we can do anything we want with this object. The new_blog object has an attribute corresponding to every field in the Blog model; we need to assign the current user to the owner field.
That's exactly what the next line does:
new_blog.owner = request.user
Every request has a user object associated with it, which is an instance of the User model. This is either an authenticated user, or an anonymous user. This line tells Django to set the currently authenticated user as the owner of the new blog. (We'll prevent anonymous users from accessing this page shortly.)
Once the blog has an owner, we can call save():
new_blog.save()
Now that all the required information is defined, saving the new blog to the database should work.
The next line redirects the user to the blogs page:
return redirect("blogs:blogs")
At this point, the user should see their blog listed at the bottom of the page.
The new_blog template
The view function processes the form, so now we need a template for rendering the form. Here's new_blog.html, which is similar in structure to register.html:
{% extends "blogs/base.html" %}

{% block content %}

  <h2>Create a new blog</h2>

  <form action="{% url 'blogs:new_blog' %}" method='post'>
    {% csrf_token %}
    {{ form.as_div }}

    <button name="submit" class="button primary">Create blog</button>
  </form>

{% endblock content %}The <form> element includes a CSRF token, and renders the form as a collection of <div> elements. When users click the Create blog button, the form's action attribute sends the data back to the new_blog page for processing.
Linking to the new_blog page
We need to add a link to the new_blog page, but we need to make sure it only shows up when users are logged in. Here's the change to base.html, in the block that defines the left side of the navigation bar:
<div class="nav-left">
  <a class="active" href="{% url 'blogs:index' %}">
      BlogMaker Lite</a>
  <a href="{% url 'blogs:blogs' %}">All blogs</a>

  {% if user.is_authenticated %}
    <a href="{% url 'blogs:new_blog' %}">Create blog</a>
  {% endif %}
</div>
If the user.is_authenticated attribute is True, we show a link to the new_blog page.
Using the new_blog page
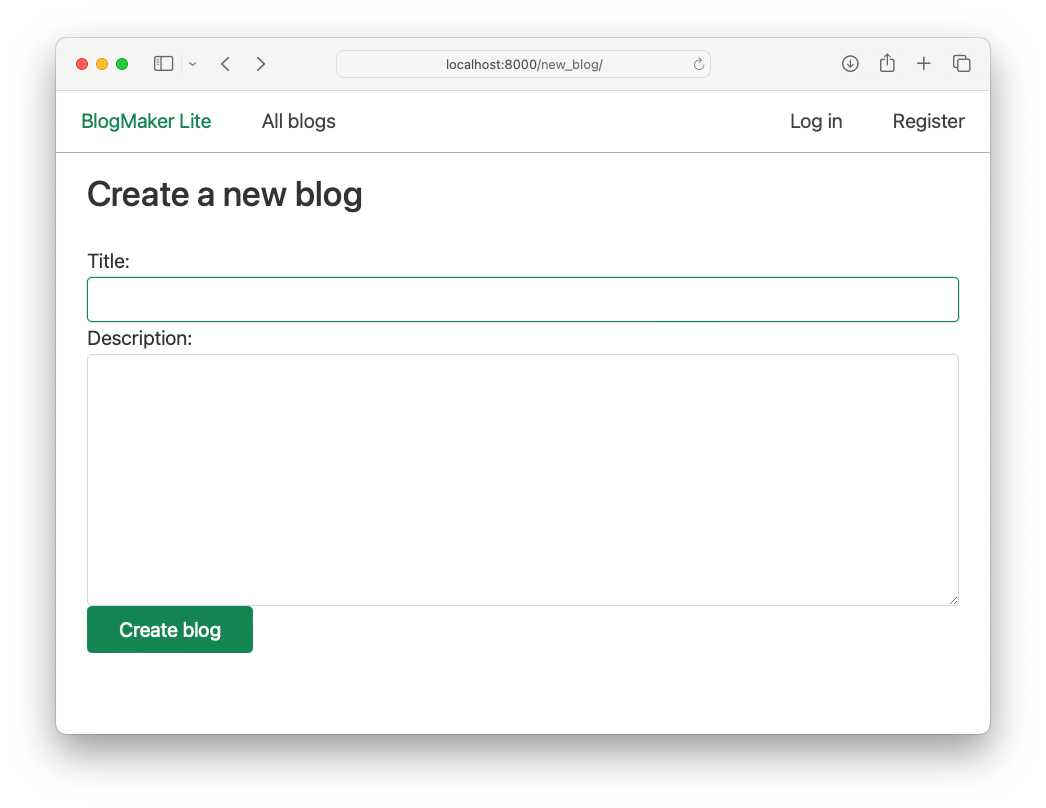
Log in to BlogMaker Lite, and click the Create blog link. You should see something like this:
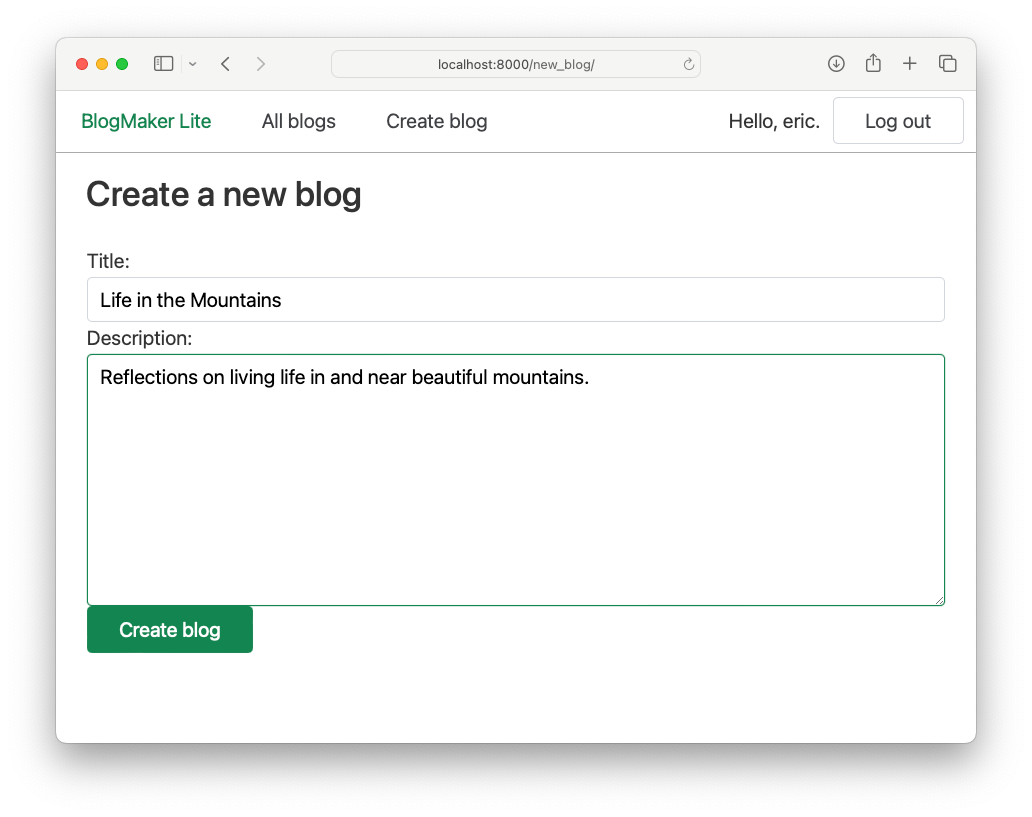
new_blog page, with both fields filled in for a new blog.If you enter a title and description and click Create blog, you should see your blog at the end of the list of sample blogs:
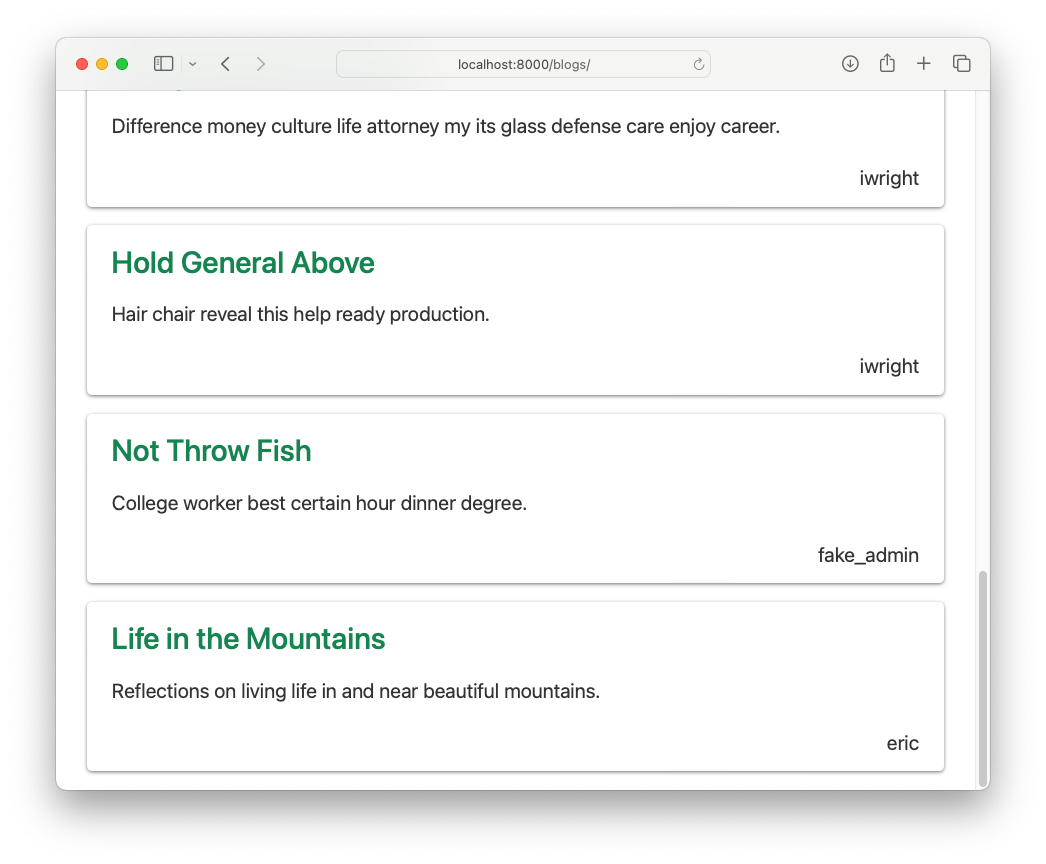
Clicking on the new blog's title will bring you to the blog page, where you'll see the message No posts have been written yet.2
Protecting the new_blog page
The link to the new_blog page is hidden from anonymous users, but they can still reach the page by entering the URL manually:
new_blog page is available to anonymous users, if they enter the correct URL manually.Anonymous users can't actually create a new blog. If they try, a database error will occur because there's no currently authenticated user to assign the blog to.
Even though they can't use the page, we still don't want anonymous users to end up on this page at all. We can prevent them from seeing this page entirely by using the @login_required decorator on the new_blog() view function:
from django.shortcuts import render, redirect
from django.contrib.auth.decorators import login_required
...

@login_required
def new_blog(request):
    ...
We import the login_required function, and then use it as a decorator on the new_blog() function. If you're unfamiliar with decorators, this syntax tells Python to run the login_required() function just before running the new_blog() function.
The login_required() function checks to see if the current user is authenticated or not. If they are, execution proceeds and they'll see the new_blog page. If they are not authenticated, they'll immediately be redirected to the login page. If that happens, the new_blog() function never even runs.3
A variety of blog pages
If you have a large amount of sample data in your project, you might have had to scroll a long way to see any new blogs that are created. In a fully-built version of this project, we'd want to implement pagination on the blogs page. I won't be covering it in this series, but if you're interested in trying that, see the documentation for Django's pagination features.
You might also want to add one more link to the navigation bar, showing just the blogs that the current user owns. It might also be a good idea to build a page where users can click on the owner of a blog, and see all the blogs that user owns. If your navigation bar is getting crowded, you might try to put some of the links into a drop-down list.
Conclusions
We're getting really close to a finished initial version of the site. People can now view existing blogs, make an account, and create their own blog. If they try to access a page they shouldn't, they'll be redirected to a more appropriate page. In the next installment, we'll build a page where users can write their own posts.
Resources
You can find the code files from this post in the django-first-principles GitHub repository. The commits from this post are on the part_16 branch. Commits for this branch start at 9cce61, with the message Added BlogForm.
If you're interested in learning more about forms, see the Working with forms documentation page. Also, you might be interested in reviewing the documentation for the ModelForm class. And, as always, I encourage you to look at the source code as well. The source for ModelForm is one line! Most of the actual functionality is implemented in the class BaseModelForm. There's a lot of code in that class, but if you look at the method names you'll start to see a connection between what you're reading in the documentation, and what you're seeing in the source code.
Django makes it straightforward to generate the forms you need, up to a certain degree of complexity. Once your forms start having multiple parts that depend on each other, it can require more work and understanding to build an effective form. The end goal should be to get the data you need, but also do it in a way that's intuitive and as straightforward as possible for your users.
If you're not entirely clear about this form processing logic, I encourage you to poke at it with a couple print() calls.
In the new_blog() view function, add these two lines:
def new_blog(request):
    if request.method != "POST":
        ...
    else:
        form = BlogForm(data=request.POST)
        if form.is_valid():
            new_blog = form.save(commit=False)
            print(new_blog)
            print(new_blog.__dict__)

            new_blog.owner = request.user
            new_blog.save()
            return redirect("blogs:blogs")

    context = {"form": form}
    return render(request, "blogs/new_blog.html", context)
This will show you what new_blog looks like, right after calling form.save() with the commit=False argument. The first print() call doesn't show much, because the Blog model has a __str__() method that just returns the title. Printing new_blog.__dict__ shows exactly what's contained in the new_blog object.
If you add these lines and then use the new_blog page to create a blog, you should see something like the following in your runserver output:
15/Jul/2024 11:45:54] "GET /new_blog/ HTTP/1.1" 200 1644
My New Blog
{'_state': <django.db.models.base.ModelState object at 0x103a339e0>,  'id': None, 'title': 'My New Blog',
  'description': 'Such a great new blog!',
  'date_added': None, 'owner_id': None}
[15/Jul/2024 11:46:05] "POST /new_blog/ HTTP/1.1" 302 0
[15/Jul/2024 11:46:05] "GET /blogs/ HTTP/1.1" 200 4480
The title and description fields have values, but the date_added and owner_id fields are set to None. The date_added field will be filled in automatically, but the owner_id field will not.
If you're curious to see more, add those same two print() calls after request.user has been assigned to new_blog.owner, and then after the final call to save(). You should see the missing values filled in after each of these steps.
Django 5.1 will introduce a @login_not_required decorator, along with LoginRequiredMiddleware. This will flip the logic about protecting pages. Rather than all pages being open, and choosing which pages to protect, you can include the LoginRequiredMiddleware and all pages will require authentication by default. You can then choose which pages to open up to anonymous users by applying the @login_not_required decorator.
This is a welcome change, and makes for a much simpler approach to managing which pages are open to anonymous users.
