Django 5.0 is out!
MP 71: And upgrading is probably easier than you think.
Django 5.0 was officially released last week. In this post, I’ll share a few things about this latest release:
- Where to go to learn about the newest features in Django;
- How to make sense of Django’s version numbering system;
- How to see if your project can easily be upgraded to 5.0;
- How to deploy a Django project in just three steps.
If you’re using Django and aren’t already familiar with its release cycle and upgrade process, read on for a little insight into how it works.
What’s new in 5.0
A lot has already been written about the new features in Django 5.0. Rather than repeating what others have written, I’ll simply point you to some of the resources that I’ve found most helpful:
Official announcement
The official announcement is always short and to the point. It mentions a few highlights, and includes links to relevant parts of the documentation.

Release notes
If you want to keep up with Django development, it’s well worth your time to scroll through the entire set of release notes. I don’t encourage you to do a close reading of the entire document. However, becoming familiar with the structure of this document, and glancing through everything in it, will give you a good sense of how much active development Django sees in a single release cycle.
The most significant new features are mentioned in the official announcement, and in many blog posts. They’re also described in the first few sections of the release notes. But there’s a long list of minor features that are worth reading through, especially in areas of Django that are most relevant to your work. For example, if you do a lot of GIS work, you’d probably be interested in looking at the specific release notes for django.contrib.gis.
There are also sections about backwards incompatible changes, deprecated features, and features that were finally removed in 5.0. If you want to make sure your Django projects can be upgraded reasonably efficiently, paying attention to these deprecation sections on an ongoing basis is important.
New goodies in Django 5.0
Marius Felisiak is one of the Django Fellows. It’s his job to keep up with new developments in Django, so he’s in an excellent place to write up the new features that just came out.
Understanding Django’s version numbering system
Django uses a very consistent version numbering system, but unfortunately it’s a little misleading about what kind of changes people should expect to see in a new release.
I think people tend to associate X.0 releases of any library with a bunch of backwards-incompatible, breaking changes. While Django 5.0 does have some backwards-incompatible changes, they aren’t particularly significant. Each release of Django has some breaking changes; the goal is to manage these carefully, so that people can steadily upgrade their projects over long periods of time. If you read each version’s release notes, you’ll have over a year of notice about any upcoming deprecations that are relevant to your work.
Django’s numbering system
Django makes three releases per major version number: X.0, X.1, and X.2. A new version comes out about every eight months.
For example, these are the most recent releases:
4.0, 4.1, 4.2, 5.0And here are the next few versions we’ll see:
5.1, 5.2, 6.0, 6.1, 6.2LTS releases
It’s helpful to focus on the X.2 releases when trying to understand Django’s version numbering system. The X.2 releases are considered LTS (long-term support) releases.
Here’s how this is described in the 4.2 release notes:
Django 4.2 is designated as a long-term support release. It will receive security updates for at least three years after its release.
Non-LTS releases
The X.0 and X.1 releases receive active updates for eight months, and security updates for another eight months. This means Django 5.0 will receive active updates through August 2024, and security updates through April 2025.
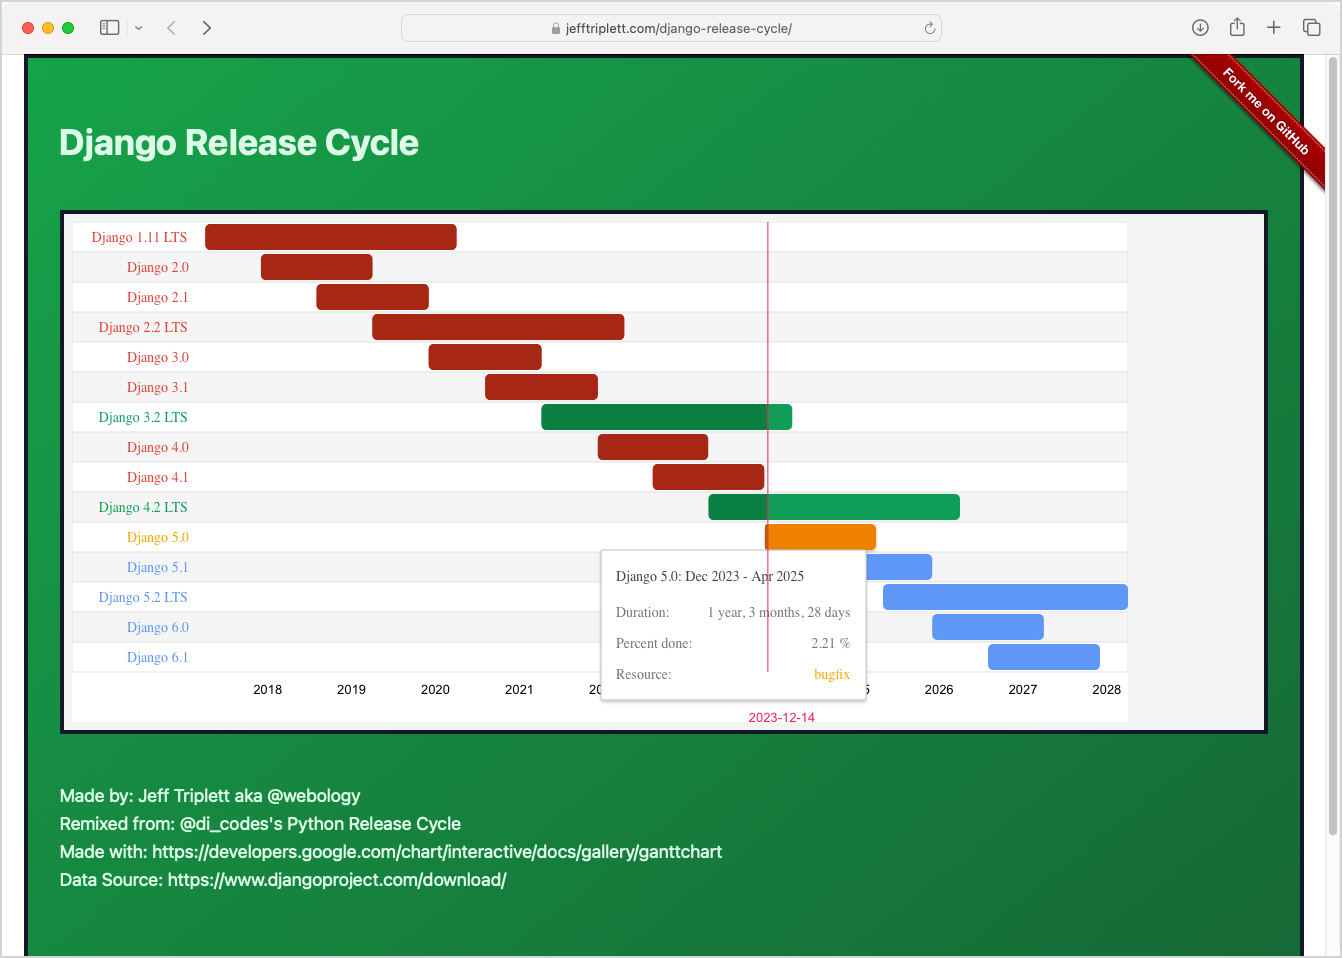
Visualizing support
There’s a great visualization of the support lifetimes for each version in the Supported Versions section of Django’s Download page:
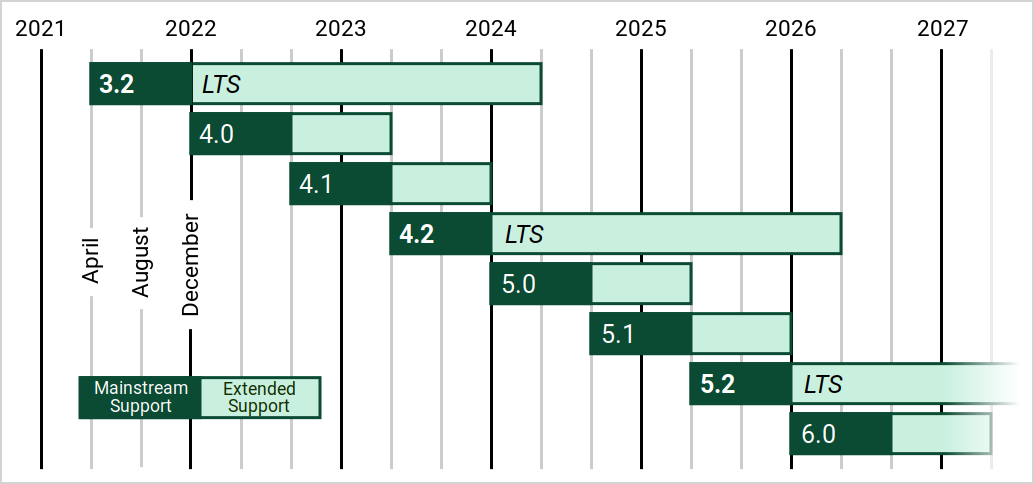
In a followup conversation after this post was initially released, I was reminded that there’s a better version of this timeline:
This visualization uses colors to indicate which state each release is currently in. Red indicates an older, unmaintained release. Green releases are receiving security updates. Yellow releases are receiving bug fixes and security updates, and blue versions are prereleases.
Recommendations
So which version should you use, and how should you think about upgrading? Django has built a well-deserved reputation for stability and reliability. If a feature makes it into a release, it’s almost certainly not going to cause you problems in production.
The old recommendation was to consider LTS releases unless you needed the features in a non-LTS release. That advice is outdated at this point. I would recommend the following:
- If you can commit to upgrading your project at least once a year, always upgrade to the most recent version that’s been released.
- If you can’t commit to upgrading at least once a year, consider focusing on LTS releases.
One advantage of staying on the latest release is that your upgrades are likely to be easier. Regardless of which strategy you adopt, you should always update your version to the latest point release. That is, if you’re using Django 5.0, you should upgrade to 5.0.1 as soon as it’s released. These minor point releases contain important security patches, and should never cause breaking changes.
Note: If you want to read all the details to inform your own upgrade policy, see the official documentation page for Django’s release process.
Upgrading a project
I have a project that’s currently running on Django 4.1. This is a sample project, but I’m going to show how to update it to run on Django 5.0. If you have a project that isn’t overly complex, you can probably follow a similar upgrade process.
Upgrading to the latest version is often not as hard as people think. You can try to upgrade in an isolated environment, and get a quick sense of how easily your upgrade path will be. This is especially true if you have a reasonably effective set of tests for your project.
BlogMaker Lite, on Django 4.1
BlogMaker Lite is a sample project I made a while back when developing a separate project focused on deployment. This is a relatively simple Django project, but it’s not trivial. It has user accounts, and uses a third-party package for styling.
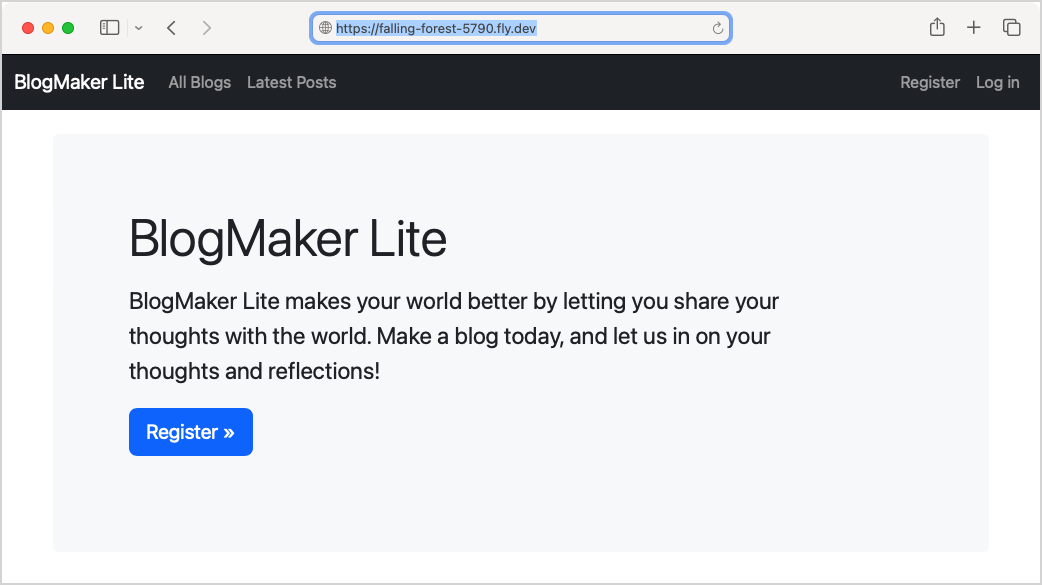
I haven’t touched this project in a while. Let’s clone it, start the development server, and make sure it still works:1
$ git clone https://github.com/ehmatthes/dsd_sample_blog_reqtxt.git
$ cd dsd_sample_blog_reqtxt
$ python -m venv b_env
$ source b_env/bin/activate
(b_env)$ pip install -r requirements.txt
(b_env)$ python manage.py migrate
(b_env)$ python manage.py runserver
Here’s the project’s home page:

The home page renders fine.
Let’s run the tests, and see if the project functions correctly. This project doesn’t have a standard Django test suite. I was focused on using this project to run repeated deployment attempts, so I was most interested in whether the project functioned correctly regardless of where and how it was deployed. It’s a simple set of calls to the project’s URLs using requests, followed by assertions about the contents of the response object. These days I’d probably use pytest for this, but I have no pressing need to change the current test script.
Here’s the test run:
(b_env)$ python test_deployed_app_functionality.py \
    --url http://localhost:8000

Testing functionality of deployed app at http://localhost:8000/...

  Checking anonymous home page...
  Checking empty anonmyous all_blogs page...
  Checking empty anonmyous latest_posts page...
  ...
The tests all pass, including the ones that make a new user, a new blog, and a couple blog posts. The last test fails, but that test checks that DEBUG is set to False for a deployed project. This isn’t a live deployment, so I was expecting that test to fail.
BlogMaker Lite, on Django 5.0
Now let’s upgrade Django to 5.0, and see if the tests still pass:
(b_env)$ git checkout -b try_django_50
(b_env)$ pip install --upgrade django==5.0
Collecting django==5.0
  ...
Successfully installed asgiref-3.7.2 django-5.0
(b_env)$ python manage.py runserver
...
Django version 5.0, using settings 'blog.settings'
...
I’m making a new branch for this work, so it’s easy to move forward with the upgrade or roll back to the 4.1 version of the project.
Installation of Django 5.0 was successful. I also restarted the development server, so it’s using the new version of Django to serve requests.
Now we can run the tests again. The test script has a flag, —-flush-db, that flushes the database before running the tests. This is useful when testing repeated deployments. I’ll use that here, because the tests look for only the data that’s created during a single run of the test suite:
(b_env)$ python test_deployed_app_functionality.py \
    --url http://localhost:8000 --flush-db
Flushing db before running test...
  Flushed db.

Testing functionality of deployed app at http://localhost:8000/...

  Checking anonymous home page...
  Checking empty anonmyous all_blogs page...
  Checking empty anonmyous latest_posts page...
  ...
The tests still pass, which means the basic functionality of this project works on Django 5.0.
Updating requirements
To conclude the upgrade process, we can now re-freeze the requirements:
(b_env)$ pip freeze > requirements.txt
(b_env)$ git commit -am "Upgraded to Django 5.0."
(b_env)$ git push origin try_django_50
I’ll follow this up by making a pull request and merging this change. The full PR includes updates to all the project’s dependencies, as well as Django. I also added .venv/ to the .gitignore file, so people using the more modern convention won’t accidentally commit their virtual environment.
Anyone who builds a new environment for the project will be using Django 5.0 from this point forward. If you already had a working version of the project, you could build a new virtual environment using the updated requirements, and you’d be using 5.0 as well.
Try new versions of Django early!
Many existing Django projects will run without errors on the newest version of Django. There are numerous stories about people taking really old Django projects and jumping straight to the latest version, without bothering to upgrade through all the intermediate versions. These upgrades often require some changes to the codebase, but not as many as people expect to see.
Many of the errors that people run into when upgrading to a new version are fairly minor. A quick skim of the release notes usually clarifies the changes that are needed in order to make the project run on the latest version. If you face a more significant issue during the upgrade process, the sooner you know about it the better. You’ll have more time to prepare a manageable upgrade plan.
Don’t put off trying new versions of Django. It’s often easier than you think it will be, and if it’s difficult for some reason you’ll want to know about that sooner rather than later.
Bonus: Deploying BlogMaker Lite
As a quick bonus, I’d like to show how quickly you can deploy many Django projects using django-simple-deploy, the deployment project I’ve been working on.
For example if you have an account on Fly.io and have their CLI installed, you can deploy BlogMaker Lite in just three steps. The first is installing django-simple-deploy:
(b_env)$ pip install django-simple-deploy
Collecting django-simple-deploy
...
Successfully installed django-simple-deploy-0.6.1 toml-0.10.2
Now we need to add simple_deploy to INSTALLED_APPS, in settings.py:
INSTALLED_APPS = [
    # My apps.
    'blogs',
    'users',

    # Third party apps.
    'django_bootstrap5',
    'simple_deploy',

    # Default django apps.
    'django.contrib.admin',
    ...
]
And finally, we make a call to simple_deploy, specifying the platform we want to deploy to:
(b_env)$ python manage.py simple_deploy --platform fly_io --automate-all
Configuring project for deployment...
...
The —automate-all flag tells simple_deploy to inspect the project, configure it for deployment to the specified platform, create the resources needed for deployment, commit changes, and call the platform’s deploy command. It runs migrations, and opens the project in a new browser tab:
django-simple-deploy is currently in the pre-1.0 phase, so it won’t work in all situations. But most of the difficult issues have been sorted out, so bugs that come up now should be easier to address. You can choose from three currently supported platforms: Fly.io, Platform.sh, and Heroku. If you’re curious about this project, please give it a try. If you run into any difficulties, feel free to open an issue.
Note: As with all deployment-focused work, please only try django-simple-deploy if you’re comfortable working with your platform’s dashboard, and ensuring all deployed resources have been destroyed in a timely manner.
Conclusions
New versions of popular frameworks like Django are exciting, but they can also mean a pile of work dealing with upgrades. Fortunately, upgrading Django projects to the latest version has gotten much more straightforward over the years.
If you’ve put off trying the latest version because you think it will be a lot of work, try setting up a test environment and upgrading your project. It just might go quicker than you think, and you’ll make all subsequent upgrades easier as well.
I used to name my virtual environments
something_env/, where something was an abbreviation of the overall project name. I have since adopted the convention of calling every virtual environment.venv/, like most Python developers these days. ↩