Django from first principles, part 9
MP 101: Adding a page for each individual blog.
Note: This is the ninth post in a series about building a full Django project, starting with a single file. This series will be free to everyone, as soon as each post comes out.
At this point the BlogMaker Lite project has a home page, and a page showing all the blogs that have been created so far. Both of these pages have a minimal amount of styling, using a micro CSS framework.
In this post we'll add a page that shows details about a single blog. It will show the title, and information about the most recent posts on the blog. To build this page we'll define a URL, write a view function, and write a template. We'll also add links from the blogs page to this new page.
The blog page URL pattern
We don't want to define a single URL; we want to define a pattern for URLs that point to blog pages. Here's the URL for the page that shows all blogs:
http://localhost:8000/blogs/
The page we're working on will focus on one blog. Here's a standard URL for this kind of page:
http://localhost:8000/blogs/<blog-id>/
There are three parts to this URL. The base URL is http://localhost:8000/, when we're developing locally. The second part of the URL, blogs/, indicates that this page will focus on blogs. The final part changes depending on which blog the user wants to see: <blog-id>/.
An example URL that someone might request is:
http://localhost:8000/blogs/3/
This would represent a request to see information about the blog that has the id 3.
Here's what this looks like as a URL pattern:
urlpatterns = [
    path("admin/", admin.site.urls),
    path("blogs/", blogs, name="blogs"),
    path("blogs/<int:blog_id>/", blog, name="blog"),
    path("", index, name="index"),
]
When Django receives an incoming request matching this pattern, it will assign the ID in the last part of the URL to the variable blog_id. That is, Django will watch for URLs of the form <base URL>/blogs/<int>/.
This request will be routed to the blog() view function, and it will have two arguments: request, and blog_id. This URL can be referred to throughout the project by the name "blog".
Exploring blogs in the Django shell
The blog() view function needs to get two pieces of information from the database. It needs to get the blog object corresponding to the id in the URL, and it needs to get all the blog posts associated with that blog.
Let's do a little exploration in the shell, before writing the view function:
(.venv)$ python manage.py shell
>>> from blogs.models import Blog
>>> blogs = Blog.objects.all()
>>> blogs
<QuerySet [<Blog: My Python Blog>, <Blog: Learning Rust>]>
We start a shell session, and import the Blog model. We then query to select all the Blog objects currently in the database. I have two blogs at this point: My Python Blog, and Learning Rust.
Let's see the IDs of these two blogs:
>>> for blog in blogs:
...   blog.title, blog.id
...
('My Python Blog', 1)
('Learning Rust', 2)
My Python Blog has an id of 1, and Learning Rust has an id of 2. We won't hard-code these IDs in our view code, but it's helpful to know these values when working in the shell.
Let's get all the blog posts associated with My Python Blog:
>>> my_python_blog = Blog.objects.get(id=1)
>>> posts = my_python_blog.blogpost_set.all()
>>> posts
<QuerySet [<BlogPost: Python is great>, <BlogPost: Python is super!>]>
We first get the blog associated with id=1, and assign it to my_python_blog. We then call my_python_blog.blogpost_set.all(). This code queries for the set of all BlogPost objects (blogpost_set) associated with my_python_blog. We assign that queryset to posts. The result shows that there are two posts associated with this blog at the moment.
The blog() view function
Working out your queries in the shell is much easier than trying to get them right in a view function. If you make a mistake in a shell session, you can just try a different query on the next line. If you make a mistake in the view code, it can be harder to trace back to the root cause of the issue. You might have a hard time figuring out if your mistake was in the URL pattern, the view function, the template, or somewhere else in the request-response cycle.
Let's write the view function, using what we worked out in the shell:
...
def index(request):
    ...

def blogs(request):
    ...

def blog(request, blog_id):
    blog = Blog.objects.get(id=blog_id)
    posts = blog.blogpost_set.all()

    context = {
        "blog": blog,
        "posts": posts,
    }
    return render(request, "blog.html", context)

...
The blog() function takes in a request object, and the ID of the blog that was requested. That ID is assigned to the blog_id parameter. The code for getting the blog and posts objects has exactly the same structure as the code we used in the shell session.
The template will only have access to the information we pack into the context dictionary. Here we store the blog object with the key "blog", and the posts object with the key "posts". The call to render() includes the request, the name of the template we want to use for rendering the page, and the context dictionary.
The blog template
Now that the view function has everything it needs, we can write a template for the page. The template should inherit from base.html so it gets the same navigation bar as the other pages, and it should be structured similar to the blogs page.
Here's what blog.html should look like. Notice how similar it is in structure to blogs.html:
{% extends "base.html" %}

{% block content %}

  <h2>{{ blog.title }}</h2>

  {% for post in posts %}

    <div class="card">
      <header><h3>{{ post.title }}</h3></header>
      <p>{{ post.date_added|date:"DATE_FORMAT"}}</p>
      <p>{{ post.body|truncatewords:10 }}</p>
    </div>

  {% empty %}
    <h3>No posts have been written yet.</h3>
  {% endfor %}

{% endblock content %}
This template extends the base.html template, and opens a content block, just as the other templates have. We use the blog's title as a title for the page. Remember that the data for an element like {{ blog.title }} is passed through the context dictionary. When Django reaches this element, it looks in the context dictionary for a key named "blog". It then looks to see if the value associated with that key has an attribute title. If it does, that's what's used to render this part of the page.
If any element in that lookup chain is missing—for example if the context dictionary wasn't passed through render(), the key was missing or misspelled, the blog object doesn't actually have a title attribute—then this element will just be empty. Django's templates fail silently. They don't generate errors, because those errors would end up being displayed to end users, which is almost certainly not what you want to happen. If you see information simply missing from a page that was rendered through a template, try to trace this chain backwards. Make sure all these pieces of information match, and try it yourself in the shell.
The main part of the blog page is a card element, with three pieces of information for each blog post. Each card has the title of a post, the date it was added, and the first 10 words of the post. A template filter modifies a value that's been passed to a template. Here we use the date filter, as well as the truncatewords filter. Django has a lot more built-in template tags and filters, and it's definitely worth your time to skim them and become familiar with what's available.
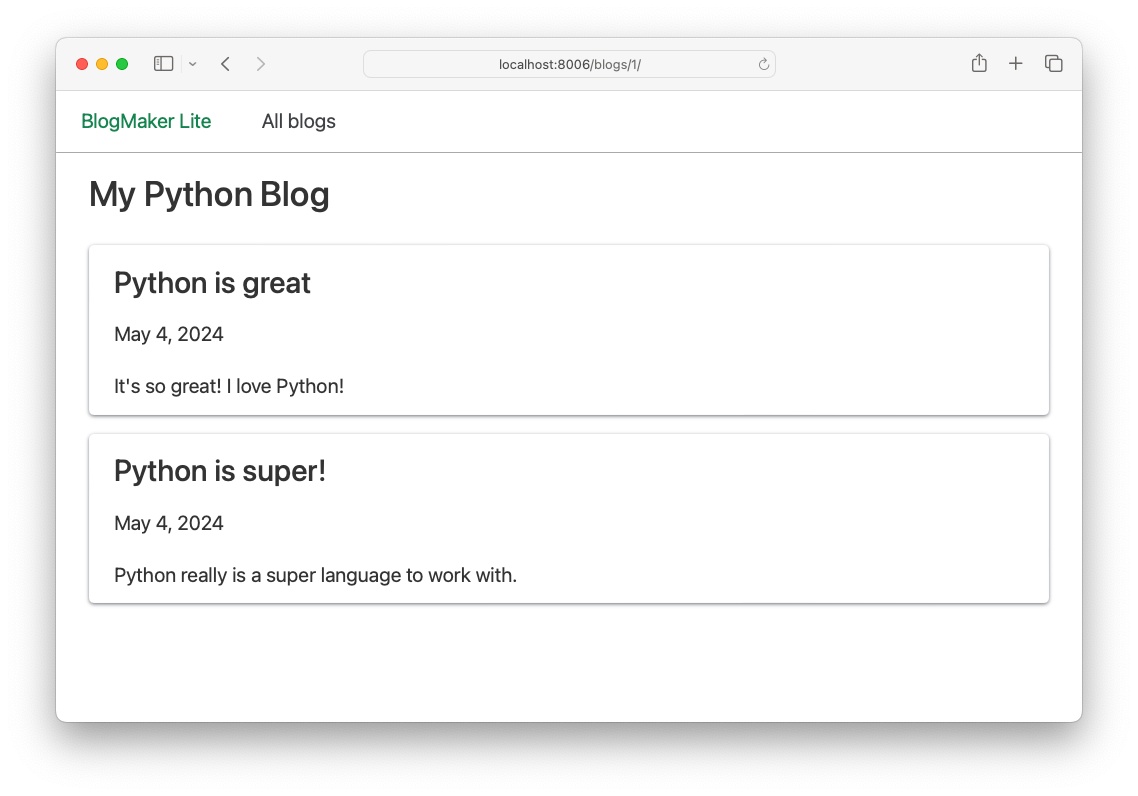
We can see what this page looks like by constructing a URL that we know should exist. I have a blog with an id of 1, so I should be able to visit the URL http://localhost:8000/blogs/1/ to see the rendered version of this page:

We'll refine this page as the sample data becomes more realistic.
Adding links from the blogs page
We don't want users to have to manually enter URLs with blog IDs, so let's construct a link to each blog's page from the blogs page.
Here's the update to the card div in blogs.html:
<div class="card">
  <header>
    <h3>
      <a href="{% url 'blog' blog.id %}">{{ blog.title }}</a>
    </h3>
  </header>
  <p>{{ blog.description }}</p>
</div>
The {{ blog.title }} element is wrapped in a url tag. The url tag points to a named URL pattern, in this case 'blog'. But the URL pattern named 'blog' requires an additional parameter, representing the id of the blog that the link will point to. We can pull that from the id attribute of blog, on each pass through the loop in the template.
In other words, the tag {% url 'blog' blog.id %} generates a URL that matches the URL pattern named 'blog', with an ID corresponding to the current blog's id attribute. For My Python Blog, that will be http://localhost:8000/blogs/1/.
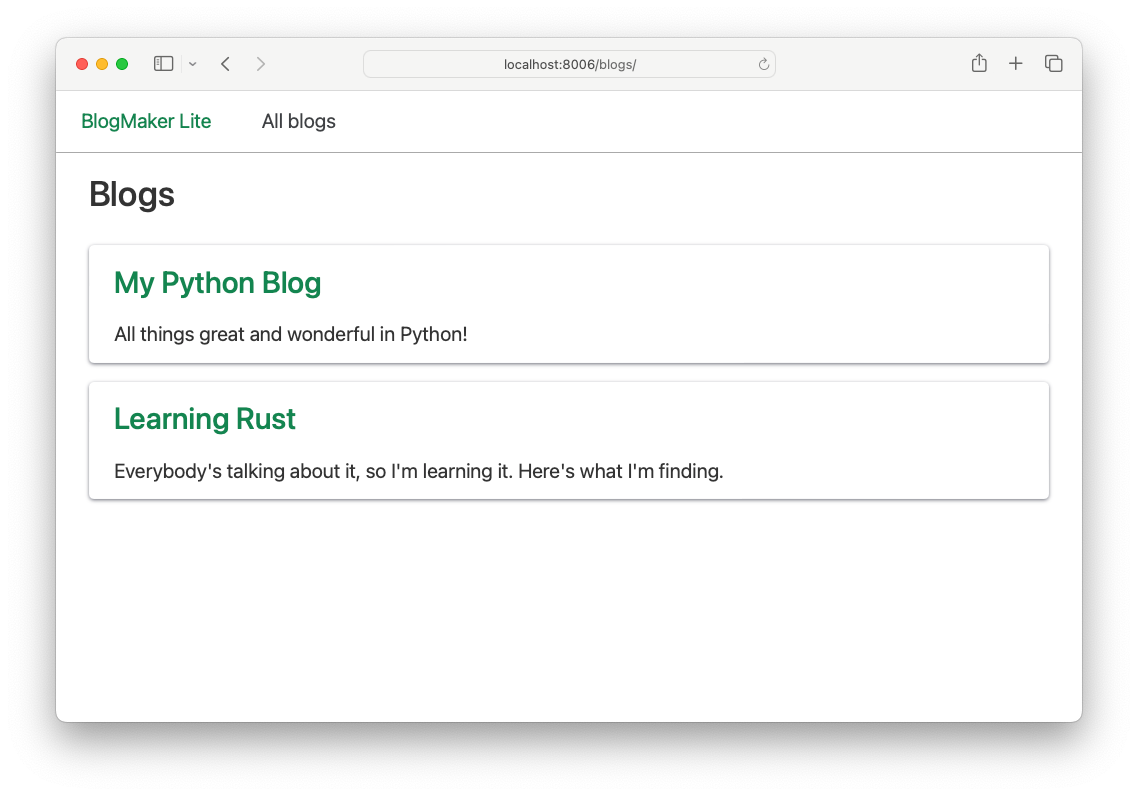
When you load the blogs page, each blog title should now link to the corresponding page for that blog:

With this change, you can click back and forth between the page showing all blogs, and the pages focusing on individual blogs.
Conclusions
In this post we made a new page focusing on individual blogs. This is the first page that requires a parameter in the URL, and it's the first page that really shows the power of templates. It's a single template, that can be used to render pages for an arbitrary number of blogs. The ID that's passed in the URL specifies which blog's information should be displayed on the page.
In real-world projects we tend to use hashes, or UUIDs (universally unique identifiers), to prevent attackers from simply incrementing the values of IDs in URLs. This would let people deduce the size of your dataset, for example. But the concept of building a page like this is the same whether you use simple IDs or UUIDs: the URL pattern includes a parameter that species which blog should be retrieved for the current request. The URL dispatcher sends that parameter to the view function, which retrieves the relevant information from the database. That information is sent through the context dictionary to a template, which is used to render the page that's ultimately returned to the browser.
In the next post we'll build a page focusing on individual posts. The process will be quite similar to what you saw here.
Resources
You can find the code files from this post in the django-first-principles GitHub repository. The commits from this post are on the part_9 branch. Commits for this branch start at 88d56a, with the message URL pattern defined for blog pages.


