Django from first principles, part 5

MP 95: Modeling blog posts, and retrieving specific data from the database.
Note: This is the fifth post in a series about building a full Django project, starting with a single file. This series will be free to everyone, as soon as each post comes out.
In the last post we created a model for a blog, and used the Django admin site to create the first few sample blogs in the project. That required a lot of setup work, which is typically taken care of by Django's startproject and startapp commands.
In this installment, we'll model a blog post, and register that model with the admin site. We'll use the admin site to enter a few sample posts, and then see how to writer queries that retrieve specific data from a Django project.
Modeling a blog post
We'll start by asking a question about what kind of data we want to work with:
What's the simplest way we can represent a blog post?
A blog post needs a title, and a body. It also has an author, but we'll come back to that when we set up user accounts.
The BlogPost model
To model a blog post, add the following to models.py:
from django.db import models

class Blog(models.Model):
    ...

class BlogPost(models.Model):
    title = models.CharField(max_length=500)
    body = models.TextField()
    blog = models.ForeignKey(Blog, on_delete=models.CASCADE)
    date_added = models.DateTimeField(auto_now_add=True)

    def __str__(self):
        return self.title[:50]
This class is structured much like the Blog class we developed earlier. It inherits from models.Model. Each post has a title, which can have a maximum length of 500 characters. The body is represented as a TextField, which means it can have an arbitrary length.
What's new here is the ForeignKey field:
blog = models.ForeignKey(Blog, on_delete=models.CASCADE)
One of the main goals of a database is to avoid storing redundant data. A foreign key establishes a connection between two pieces of information in a database. In this case, every blog post needs to be connected to a specific blog. The variable blog is a foreign key that points to a specific instance of Blog.
The argument on_delete specifies exactly what should happen if a blog is deleted. The value models.CASCADE says that if a blog is deleted, all instances of BlogPost associated with that blog should be deleted as well.
Note that the __str__() method returns just the first 50 characters of the post's title. Titles can be fairly long, and this limitation makes dashboard and terminal output much more manageable.
Generating the migration file
We just defined a new kind of information that will be stored in the project's database. Any time we do that, we need to generate a migration file specifying exactly how the database will be modified so it can store this information.
Run the makemigrations command again, to generate a new migration file:
(.venv)bml_project$ python manage.py makemigrations blogs
Migrations for 'blogs':
  blogs/migrations/0002_blogpost.py
    - Create model BlogPost
Here Django took note of the existing migration file, and generated a new migration file called 0002_blogpost.py. This enables Django to either migrate the existing database to match the current state or the project, or migrate a freshly-created database to match the current state. 1
Migrating the database
We have a new migration file, but it hasn't been applied yet. To do that, run the migrate command again:
(.venv)bml_project$ python manage.py migrate
Operations to perform:
  Apply all migrations: admin, auth, blogs, ...
Running migrations:
  Applying blogs.0002_blogpost... OK
Django looks through all the apps in the project, checking to see which ones need to have a new migration applied. It finds an unapplied migration file in the blogs/migrations/ directory, runs that migration, and everything is OK.
Registering BlogPost with the admin site
We did a lot of work in the last post to start using the Django admin site. With all that setup work done, we can start working with blog posts by making just two small changes to the main blogmaker_lite.py file:
...
from django.contrib import admin

from blogs.models import Blog, BlogPost

admin.site.register((Blog, BlogPost))

def index(request):
    ...
We import the BlogPost model, and register both the Blog and BlogPost models. Note the nested parentheses in the call to admin.site.register(). This method requires either a single model, or a sequence of models. Here we're passing a tuple containing the two models we want to register.
Writing some blog posts
Now we can load the admin site, and write a blog post. If you enter http://localhost:8000/admin/ into your browser's address bar and click through to the screen for adding a new blog post, you should see something like the following:
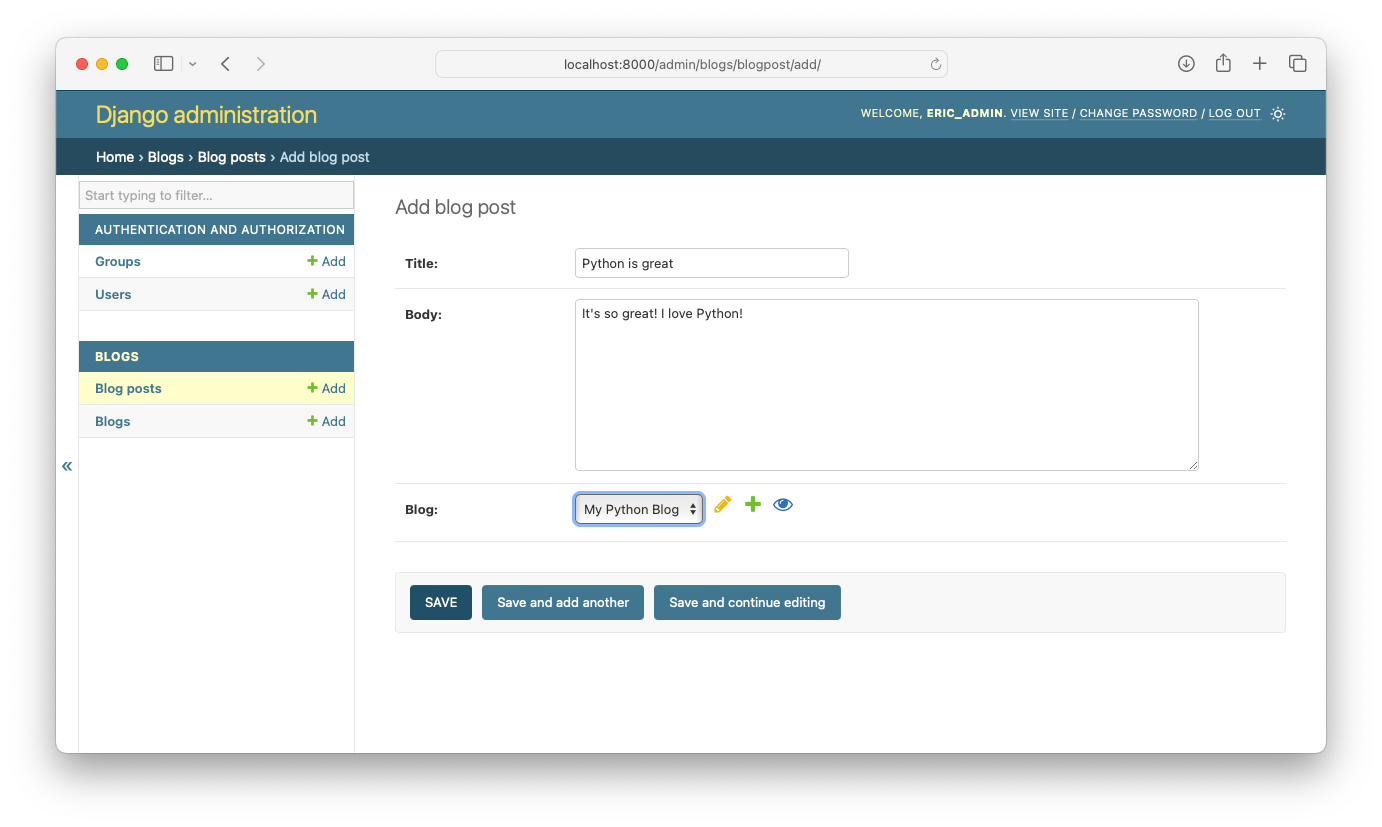
Blog model shows up as a dropdown list, allowing us to connect this new post to a specific blog.To make a new post, you need to do four things:
- Enter a title for your post;
- Enter the body of the post;
- Select which blog this post should be associated with;
- Click Save.
You can see that Django is doing a lot of work with just a few lines of code that we've written!
Go ahead and enter a few short posts on some of your blogs. Don't put any serious thought into what you're writing, because your database may end up in a broken state as you're learning your way around a web project. Also, a little later in the series we'll use a much simpler way to enter arbitrary amounts of sample data into the project.
The Django shell
Once your project is up and running, the information stored in your database is probably the most important part of your project. Django offers a terminal-based way to explore your data. This is a great way to learn how to work with data in Django, because you get immediate feedback about whether the code you've written does what you want it to.
In a terminal with an active virtual environment, run the shell command:
(.venv)bml_project$ python manage.py shell
>>>
This is a Python terminal session, where you have access to all the code in your project. Start by importing the models that have been created:
>>> from blogs.models import Blog, BlogPost
>>>
With these models imported, we can start to query the database. A query is a request for a specific subset of data stored in the database.
Let's first see all the Blog models that have been stored:
>>> all_blogs = Blog.objects.all()
>>> all_blogs
<QuerySet [<Blog: My Python Blog>, <Blog: Learning Rust>]>
Each query returns a QuerySet object. A queryset is a sequence of objects representing data from the database, matching the query that was executed. This query, Blog.objects.all(), asks Django to do the following:
- Find all the information in the database associated with the
Blogmodel; - Pull that information from the database;
- Convert it to a sequence of Python objects.
You get to have a database, but spend most of your time working with just Python code.
The Django ORM
The information in the database isn't stored in any format specific to Python. As you continue to work with Django, you'll hear about "the ORM". When you write code in a Django project, you write Python code and work with Python objects. But the database stores information in tables, made up of columns and rows, and relationships between those elements. The ORM is an object-relational mapping tool.
When you write information to the database, the ORM converts Python objects into pieces of information stored in appropriate places and formats in the database. When you issue queries, the ORM converts information in the database back into Python objects.
If you haven't heard of it, structured query language (SQL) is the language that's used to write queries issued directly to a database. The ORM converts our Python queries, such as Blog.objects.all(), into SQL. It's a great idea to learn the basics of SQL, but you should trust the ORM to generate SQL for you unless you have a reason to think it's generating inefficient SQL. 2
Examining individual objects
Let's see exactly what information is associated with one of the blogs we retrieved:
>>> blog = all_blogs[0]
>>> blog.title
'My Python Blog'
>>> blog.description
'All things great and wonderful in Python!'
>>> blog.date_added
datetime.datetime(2024, 5, 1, 15, 14, 38, 598226, tzinfo=datetime.timezone.utc)
>>> blog.date_added.isoformat()
'2024-05-01T15:14:38.598226+00:00'
The first blog is called My Python Blog, and it's going to talk about all the things that are great and wonderful about Python. It was created on May 1, 2024.
The database stores a little more information beyond just the attributes we defined. You can see all the information associated with a Python object by looking at its __dict__ attribute. Rather than looking at the whole dictionary, let's just look at the keys, so we know what kind of information is being stored:
>>> blog.__dict__.keys()
dict_keys(['_state', 'id', 'title', 'description', 'date_added'])
There are two attributes of a blog that we didn't define: _state, and id. Django uses the _state attribute internally to keep track of things like whether the object has been saved to the database or not.
The id attribute is a unique identifier for this particular blog. The ID gives us an efficient way to refer to an object that came from the database; it's also used to store the relationships between different pieces of information in the overall dataset. For example, id is the attribute used to define foreign key relationships.
Let's see what the id of My Python Blog is:
>>> blog.id
1
If you know an object's id, you can issue a query for that object directly:
>>> my_python_blog = Blog.objects.get(id=1)
>>> my_python_blog
<Blog: My Python Blog>
The get() method is used to return a single piece of information from the database. Here we specify that we want the Blog object whose id attribute is 1.
This is a common way to get a specific piece of information from the database. It's much more efficient than calling all() and pulling out a particular item from the sequence that's returned. If not managed efficiently, queries can become the slowest part of a web application. Pulling just the information you need from the database is a really important practice, and using get() with the right arguments can help you query your database efficiently.
Retrieving blog posts
Getting a blog from the database is useful, but what about blog posts? First, let's write a query to retrieve all the posts in the database:
>>> all_posts = BlogPost.objects.all()
>>> all_posts
<QuerySet [<BlogPost: Python is great>,
<BlogPost: Python is super>,
<BlogPost: Why learn Rust?>]>
I entered three short blog posts through the admin site. Let's focus on the first post, and see what kinds of attributes it has:
>>> post = all_posts[0]
>>> post.__dict__.keys()
dict_keys(['_state', 'id', 'title', 'body',
'blog_id', 'date_added'])
Here we can see all the attributes we defined earlier for the BlogPost model. We also see the _state and id attributes. But there's one more attribute we haven't seen yet: blog_id. This represents the foreign key to Blog, connecting this post to a specific blog.
You won't often need to use the blog_id attribute directly. However, it's important to know that it exists, and to understand the role it plays in maintaining the correct relationships between different pieces of information in the database.
Retrieving posts for a specific blog
We won't usually need to retrieve all the posts in the database. We'll usually want to retrieve posts for a specific blog. This kind of reverse-lookup is quite common, so there's a built-in way to get these kinds of querysets.
Take a look at this shell session:
>>> from blogs.models import Blog, BlogPost
>>> blog = Blog.objects.get(id=1)
>>> blog
<Blog: My Python Blog>
>>> posts = blog.blogpost_set.all()
>>> posts
<QuerySet [<BlogPost: Python is great>,
<BlogPost: Python is super>]>
This is a fresh Django shell session. We first import the two models we want to work with, and then query for the blog with an id of 1. In my sample project, that's My Python Blog.
We then issue the query blog.blogpost_set.all(). This query asks Django to do the following:
- Look at the
blogobject. - Find a model whose lowercase name is
blogpost; in this project, that's theBlogPostmodel. - Get the set of all objects with a foreign key that matches the current
blogobject.
In other words, this query asks Django to look at all the BlogPost objects in the database, and return only the ones with a foreign key pointing to the current blog object. 3
There are many ways to refine queries so that you get exactly the data you want, and nothing more. For example, here's a query that returns the 5 most recent blog posts associated with My Python Blog:
>>> posts = blog.blogpost_set.order_by("-date_added")[:5]
The order_by() method is chained onto the query. The "-date_added" argument specifies that posts should be sorted on the date_added field, in reverse order.
The Python slice syntax [:5] makes it look like Django is grabbing all the blog posts associated with My Python Blog, and then keeping only 5 of them. But Django actually generates an SQL statement that retrieves only these 5 posts. No ORM is perfect, but Django's ORM has been optimized over a period of more than a decade, and it's quite effective at translating relatively simple queries like this one.
Conclusions
In this post we added a model for blog posts, which was much less work than adding the model for blogs. Keep in mind that when you take the standard approach of running startproject and startapp to build out a Django project, making that first model is just as easy as making the BlogPost model was. Once you understand what they're doing on your behalf, those two commands really do save you a lot of work.
The Django shell is a powerful tool, and it's a great way to learn how to write queries that retrieve exactly the information you want to work with. Explore the data in your project all you want when you're working on sample data, on your system. Be extremely cautious, however, about doing this kind of exploratory work in a shell environment on a deployed project. You really don't want to mess up any of your end users' data.
In the next post, we'll use what we learned about queries to start building public-facing pages that present nicely formatted blogs and blog posts to end users.
Resources
You can find the code files from this post in the django-first-principles GitHub repository. The commits from this post are on the part_5 branch. Commits for this branch start at 15cd7fe, with the message Added BlogPost model.
To learn more about queries and the Django ORM, check out any of the links in The model layer on the Django documentation home page. The page Making queries is most relevant to what was discussed here.
Also, the Django shell is somewhat limited in functionality. Consider installing the django-extensions library, which includes a command called shell_plus. When you run this command instead of manage.py shell, it will import all your models automatically. This, along with other features, can make for a much more efficient workflow as your project grows in complexity.
If you run migrate against an existing database, Django will only apply the most recent unapplied migrations. If you run migrate against a freshly-generated database that hasn't had any migrations applied, Django will apply the entire series of migrations, in the appropriate order.
This approach to managing migrations also makes it possible to undo migrations when needed. It isn't always easy to undo a migration, but Django tries to make it as easy as it can be.
You can see the SQL that's generated for any query that you write. For example, here's what the query requesting all Blog objects looks like after it's been converted to SQL by the ORM:
>>> all_blogs = Blog.objects.all()
>>> str(all_blogs.query)
'SELECT
    "blogs_blog"."id",
    "blogs_blog"."title",
    "blogs_blog"."description",
    "blogs_blog"."date_added"
FROM
    "blogs_blog"'
Remember that all_blogs is an instance of QuerySet. Instances of QuerySet have a query property, which returns the SQL representation of the query.
If you haven't read any SQL before, this statement selects all the attributes of each Blog object from the table blogs_blog. That table name, blogs_blog, was generated by combining the name of the app (blogs) with the lowercase name of the model (Blog).
This output has been reformatted slightly to emphasize the structure of a standard SQL statement.
To really understand this kind of reverse lookup, it can be helpful to see the SQL generated for this query:
>>> posts = blog.blogpost_set.all()
>>> str(python_posts.query)
'SELECT
    "blogs_blogpost"."id",
    ...
    "blogs_blogpost"."date_added"
FROM
    "blogs_blogpost"
WHERE
    "blogs_blogpost"."blog_id" = 1'
Even if you entirely unfamiliar with SQL, you can sort of follow the logic when a statement is formatted appropriately. This statement asks the database to select all the information associated with blog posts from the table blogs_blogpost where the value of blog_id is 1.
Before people started developing web frameworks and ORMs in the mid-2000s, you had to write this kind of SQL by hand every time you wanted some information from your database. ORMs and frameworks are great!