Django from first principles, part 10

MP 102: Making a page for individual posts.
Note: This is the tenth post in a series about building a full Django project, starting with a single file. This series will be free to everyone, as soon as each post comes out.
In the last post, we created a page focusing on individual blogs. In this post we'll go one level further, and make a page that focuses on individual blog posts. The structure and process will be much the same as we followed in the last post, which helps you develop a consistent workflow when working with Django.
The process
It's worth clarifying the process of making a new page one more time. If you understand this process, you're well on your way to working independently as a Django developer. To add a new page to the site, we're going to take the same three steps we've been taking: define a URL pattern, write a view function, and write a template. We'll base the work we're about to do on what we've already done, so we're not doing a whole lot of new thinking for this step.
You don't have to follow this order, by the way. I like to think about the URL first, but you can implement these steps in any order you like. For example you can write the view function first, and use the function's call signature to work out the information you'll need from the URL.
The URL pattern for post pages
The URL for a post page will look much like the URL for a blog page. Here's a sample URL for a page showing a single post:
http://localhost:8000/posts/5/
This URL is made up of the base URL (http://localhost:8000/), an element that indicates a focus on posts (posts/), and an ID specifying which post to focus on (5/).
Here's the new entry in urlpatterns:
urlpatterns = [
    path("admin/", admin.site.urls),
    path("blogs/", blogs, name="blogs"),
    path("blogs/<int:blog_id>/", blog, name="blog"),
    path("posts/<int:post_id>/", post, name="post"),
    path("", index, name="index"),
]
This new pattern can be referred to throughout the project by the name "post".
A quick trip to the shell
If you're comfortable enough with queries at this point, you can skip working in the shell and go straight to writing a view function. But if you're unclear at all about how to get the right blog post from the database, it's worth spending a little time in the shell to work out the syntax.
Let's see how many posts I have in the database:
$ python manage.py shell
>>> from blogs.models import BlogPost
>>> posts = BlogPost.objects.all()
>>> for post in posts:
...   post, post.id
...
(<BlogPost: Python is great>, 1)
(<BlogPost: Python is super!>, 2)
(<BlogPost: Why learn Rust?>, 3)
We import the BlogPost model, and query for all the BlogPost objects. Notice we don't have to work with the Blog model at all. I have three blog posts, with IDs ranging from 1 to 3.
We can use any of those valid IDs to get a single post:
>>> post = BlogPost.objects.get(id=2)
>>> post.title
'Python is super!'
>>> post.body
'Python really is a super language to work with.'
We can use get() to retrieve a single post from an ID, and we can then access the title and body attributes of the post.
We'll also want to access some information about the blog that the post is associated with. We can access that through the post's blog field, which is a foreign key back to the Blog model:
>>> blog = post.blog
>>> blog.title
'My Python Blog'
The main thing to recognize here is that we don't have to write a separate query to find the blog associated with this post. We can follow the foreign key backwards to get the blog directly from the post. As long as we have the right post, we can access all the information we want about the post, and the blog it's associated with as well.
The post() view function
Now that we know what the query should look like and how to access all the data we might want, we can write the view function.
Here's the view function that gets the correct post object, and sends the relevant information to the database:
def post(request, post_id):
    post = BlogPost.objects.get(id=post_id)
    blog = post.blog

    context = {
        "post": post,
        "blog": blog,
    }
    return render(request, "post.html", context)
This is structured just like the blog() view function. It retrieves the relevant data, packs it into the context dictionary, and renders the response using the post.html template. Let's write that template.
The post.html template
First, let's get all the information we want to see on the page into the template. Then we can adjust the styling a bit to make it more presentable.
Here's a first pass at putting all the relevant information onto the page:
{% extends "base.html" %}

{% block content %}

  <h2>{{ post.title }}</h2>
  <h3>{{ blog.title }}</h3>

  <p>{{ post.date_added|date:"DATE_FORMAT"}}</p>

  <div>{{ post.body|linebreaks }}</div>

{% endblock content %}This page extends base.html, just like all the pages in the project. The post title is the first element in the content block. Then we have the title of the blog, and the date the post was written. Finally we have the post body, which uses the linebreaks filter. This makes sure line breaks in the post body are represented appropriately in the HTML version of the page.
Knowing the ID for one of the posts, we can see what the page looks like so far. Here's the page at http://localhost:8000/posts/1/:
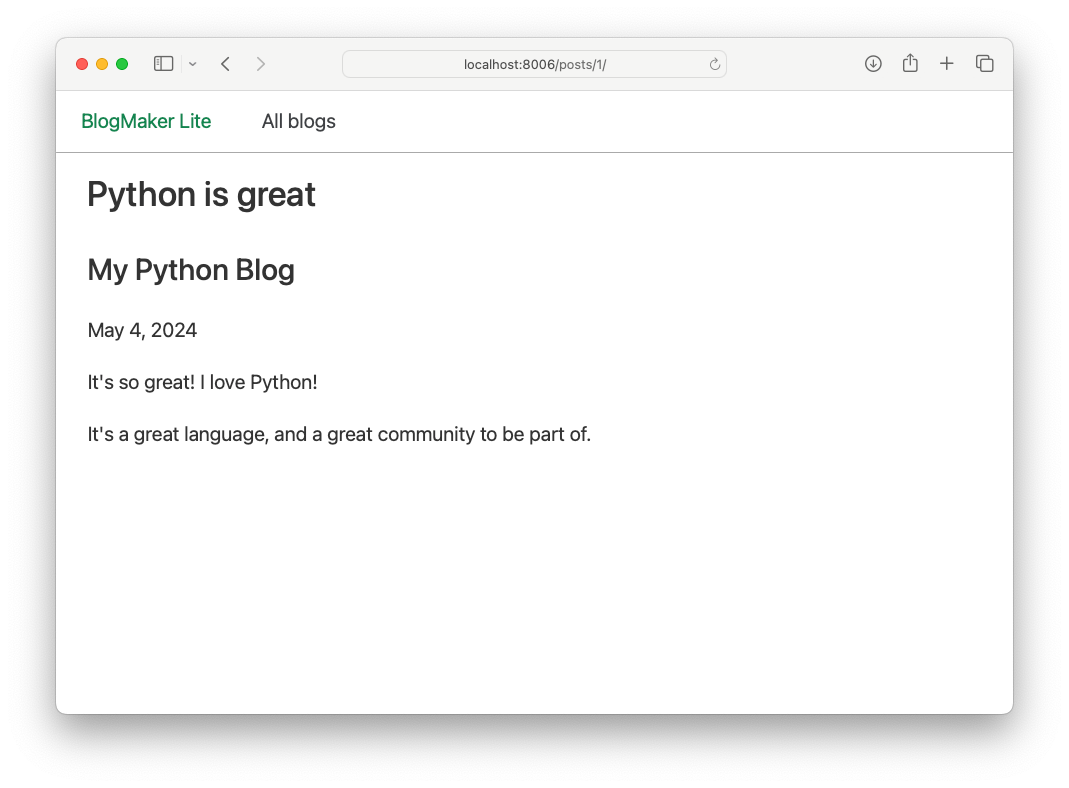
All the information is there; we just need to arrange it a little better, and add a link back to the parent blog.
Making a sketch
Here's my one-minute sketch of what I'd like this page to look like:
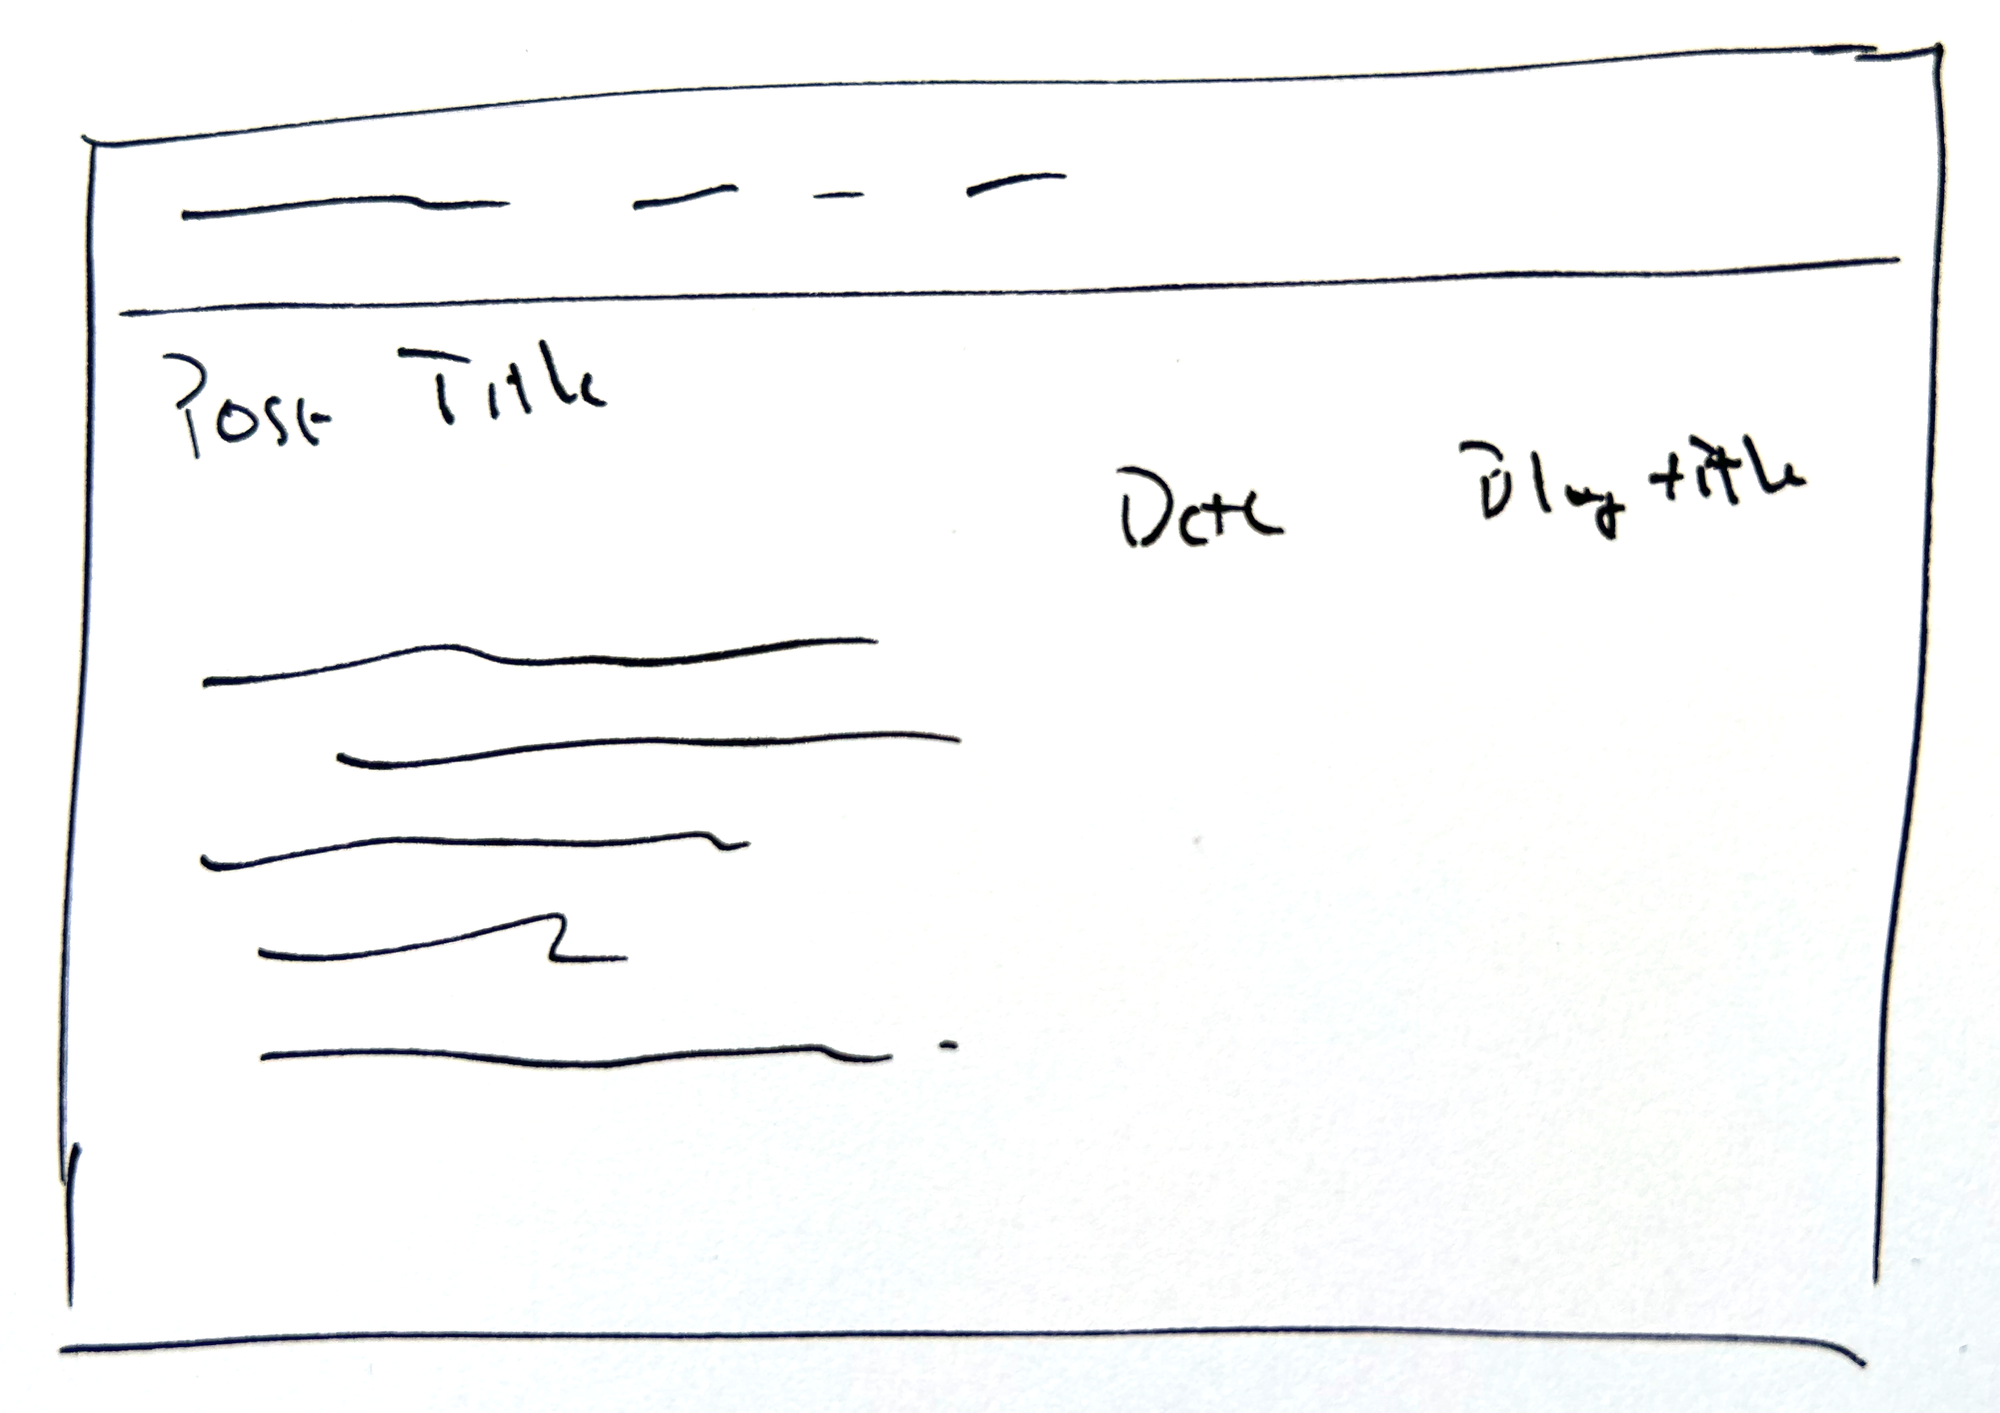
I'd like to have the post title on its own line. I'd like the date and blog title to be on a single line after that, followed by the post body.
When I make a sketch like this I don't want to match it exactly; if I find a layout I like while trying to match the sketch, I'm happy to stop at that point.
Updating the layout
We can get a slightly better layout using just a couple div elements, and a couple style rules:
{% extends "base.html" %}

{% block content %}

  <h2>{{ post.title }}</h2>

  <div class="text-right">
    <span>{{ post.date_added|date:"DATE_FORMAT"}}</span> |
    <span>{{ blog.title }}</span>
  </div>

  <div class="post-body">
    {{ post.body|linebreaks }}
  </div>

{% endblock content %}We put the date and blog title elements into a single div, with the chota class text-right. This moves those elements to the right side of their container. The date and blog title are placed in span elements, so they end up on the same line. They're separated by a single | character.
The div containing the post body has a custom class, post-body. This class has a little padding on the sides, to set it apart slightly from the rest of the page:
...
.card {
    ...
}

.post-body {
    padding-left: 15px;
    padding-right: 15px;
}
This rule adds 15 pixels of space on each side of the post body. Here's what the page looks like now:
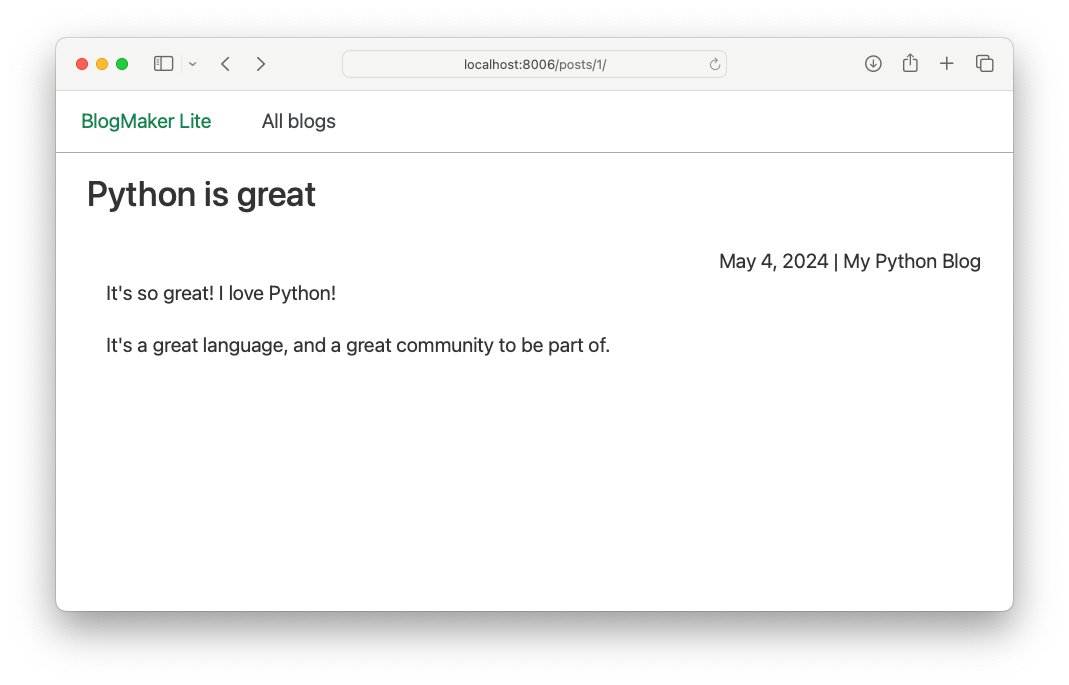
You could do more to improve the layout of this page, but all elements have been placed in a way that corresponds to the relative importance of each element on the screen. The post title is the most prominent piece of information. The date and blog title are clearly visible, but are set off to the side. The post body is centered slightly, and should fill the screen when actual posts are displayed.
Linking to the blog
The post page needs to include a link back to the main page for the parent blog.
Here's the change to post.html that adds this link:
<div class="text-right">
  <span>{{ post.date_added|date:"DATE_FORMAT"}}</span> |
  <span>
    <a href="{% url 'blog' blog.id %}">{{ blog.title }}</a>
  </span>
</div>
We use the url template tag to generate a link to the URL pattern named 'blog'. That pattern requires a parameter, the ID for the blog we're linking to. We access that through the id attribute of blog, which was passed through the context dictionary.
Now you should be able to click from the post page back to the blog page.
Linking from the blog to the post
The last thing we need to implement is a link from the blog page to the post page. Here's the change to blog.html that makes this happen:
<div class="card">
  <header>
    <h3><a href="{% url 'post' post.id %}">
        {{ post.title }}</a></h3>
  </header>
  <p>{{ post.date_added|date:"DATE_FORMAT"}}
  <p>{{ post.body|truncatewords:10 }}</p>
</div>
The {{ post.title }} element is wrapped in an <a> tag. We use the url template tag to generate a URL matching the 'post' URL pattern. This pattern needs a parameter referencing the specific post that should be linked to, which we access through post.id.
With this change, you should be able to navigate through all the blogs and posts that have been created.
Conclusions
In this phase of work we added a page that shows individual posts. The page shows all the necessary information readers need to see about a post: the title, the date it was written, the blog it came from, and the body of the post. Readers can click back and forth between posts and blogs, and navigate to any page on the site.
The project is shaping up well, but it doesn't have realistic amounts of data yet. It only has a couple blogs and a few posts, and the posts are just a sentence or two each. In the next post we'll use a third-party library to generate a much more realistic sample dataset. This will help make sure that everything really is working as it should, and it will help us refine the layout as well.
Resources
You can find the code files from this post in the django-first-principles GitHub repository. The commits from this post are on the part_10 branch. Commits for this branch start at 9fc5e7, with the message Added URL pattern for post page.